Remediating PDF Documents Scanned as Images
In this part, we will learn how to remediate a PDF document when it was scanned as an image.
An accessible PDF ensures assistive technology can access the document. When a document is scanned, resulting in an image of the document, in most cases, the document is will not meet any of the accessibility requirements.
To know if a PDF document is scanned, click on the document, if entire document is highlighted and individual text, cannot be highlighted, it is a scanned document and the text is saved as an image.
Note: A scanned PDF file can rarely be made completely accessible due to limitations with the scanning technology.
Book Scanner For Improved Accessibility
If you have printed materials and wish to create digital accessible documents for students with low vision, those using screen readers the Library offers a book scanner and software that produce high-quality scans of the printed materials. You will find all the instructions on how to use the scanner next to the book scanner and software.
How to Get Started:
Quick Demo: Schedule a quick demo with Kate Cameron to familiarize yourself with the scanner and software.
Any Questions? Contact Kate Cameron (Library Service) for any questions or assistance.
 How to Enhance the Accessibility of Scanned PDF Documents
First, let’s begin the process of implementing Optical Character Recognition (OCR) for the document:
- Click on the “Tools” tab located at the top of the window.
- Within the “Create & Edit” section, select “Scan & OCR”.
- On the right-hand side tool pane select the “Scan & OCR” menu.

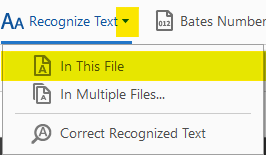
- Click on “Recognize Text” on the toolbar at the top of the window.
- Click the dropdown menu button next to “Recognize Text”

- Select “In This File” from the dropdown Menu

- The secondary toolbar with more options will be open.
- Click on the “Recognize text” blue button to launch OCR.

That’s it! You’ve successfully completed the OCR process and the document now contains readable text. However, It does not mean it is accessible because the document has no tags. You should also read through the converted text to make sure it was correctly identified.
In order to add tags you can select one of the approaches described in Remediating PDF document in Adobe Acrobat Pro.
 Using Action Wizard during Remediation Process
The Action Wizard is a tool for the PDF remediation process, allowing you to apply multiple commands to your file using a defined series of actions with specific settings and in a particular order, all in a single step.
If the tool pane does not have an action wizard, we need to add it to our tool pane!
To get the Action Wizard tool,
- Click on the “Tool” menu.
- Find the Action Wizard tool under the “Customize Tool” section.
We can also use the Action Wizard that we need to add an auto tag to the document.
- Open your PDF document, click “Action Wizard” on the menu on the right-hand side.
- Click on “Make Accessible”, then click “Start”.
Step one is “Description Window”; In this window, one essential element to review is the “Title“.
- If the title displayed in the box appears readable and understandable, you do not need to uncheck the box for “Leave as Is“.
- However, if you believe the title requires modification, uncheck the box and make the necessary changes to the document title.
- Select “ok”.
The second step is about “Recognizing Text). You need to specify the Document language, output settings should be set to searchable images.
Third step is to help us to detect form fields, or skip this step. If the document is not have form field, you can select “Skip This Step“
Step four is to “Set the Reading Language” for the document overall.
Step five is to set the “Alternative text” for images and figures. It helped us to go through all images in the document back to back and helped us to fill missing alternative text for each image back to back by clicking an arrow to move from image to image. After filling the each images alternative text then select “save & close”
The last step brings us to the accessibility checker. It is the final step in beginning to make a PDF document accessible.
 Takeaways
- PDF files generated as images of text from scanned hard-copy documents are typically inaccessible.
- To ensure accessibility, you should employ optical character recognition (OCR) software, such as Adobe Acrobat Pro, to transform the text within the image-based PDF.
 Tips
Tips
- While it’s not the recommended approach, you can use “Auto-tag document” to add tags if you are new to creating accessibility.
- Adobe Acrobat’s PDF accessibility checker has its limits. PAC is an alternative free software for checking WCAG and PDF/UA compliance.

