Scanned PDF Remediation
If a PDF document contains non-text (image-only) content, it is not accessible. When you click on the document, the entire page appears as a single image, which means a screen reader cannot read the content.
Note: A scanned PDF file can rarely be made completely accessible due to limitations with the scanning technology.
Book Scanner For Improved Accessibility
If you have printed materials and wish to create digital accessible documents for students with low vision, those using screen readers the Library offers a book scanner and software that produce high-quality scans of the printed materials. You will find all the instructions on how to use the scanner next to the book scanner and software.
How to Get Started:
Quick Demo: Schedule a quick demo with Kate Cameron to familiarize yourself with the scanner and software.
Any Questions? Contact Kate Cameron (Library Service) for any questions or assistance.
If the PDF is a scanned document, the Ally score will be very low, possibly even zero, even if the document was scanned using a book scanner at the library. After scanning our document using the high-quality book scanner available at the library (as shown below).
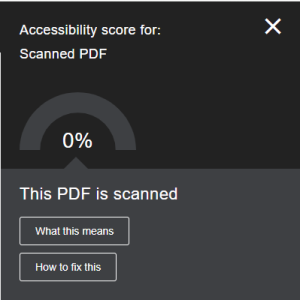
 How to Enhance the Accessibility of Scanned PDF Documents
- In the “All Tools” menu, choose “Scan & OCR.”

- In the “Scan & OCR”
 panel, go to “Recognize Text” and select “In This File.”
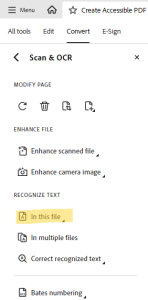
- In the Pages dialog box, select the specific pages you want to process, choose the document language, and click “Recognize Text.”
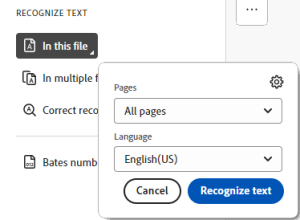
Note: This is the process where an image-only (scanned) document is converted using OCR, which stands for Optical Character Recognition. OCR technology transforms scanned paper documents, PDFs, or images into editable and searchable text by recognizing the characters within them.
Now we need to add a tag tree to the document to complete the remediation process and ensure it is fully accessible.
 How To Create A Tag Tree in Adobe Acrobat
there are three option for adding tag tree in PDF file.
- Automatically tag PDF
- Fixing Reading Order
Option #1: Autotag a PDF
In Adobe Acrobat, there is a feature that enables you to automatically add tags to a document that lacks an existing tags tree.
- Open your PDF file, then click “Prepare for Accessibility” from the “All Tools” menu in the upper left corner.
- Select on “Automatically tag PDF“.
 The process may take some time, depending on the length of the document.
 - It will appear on the right-hand side of the window.
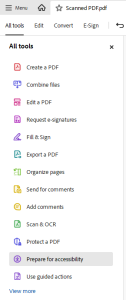
Important Note : The easiest and most effective approach is usually Auto-tagging the entire document, followed by manual tagging to clean it up. It is not uncommon for many of the auto-tags to have incorrect properties and require manual checking by the remediator. We will cover how to fix incorrect tags in the tag tree in the next chapter, “Remediating Tagged PDF“.
Option #2: Use the Fix Reading Order Tool to Create a Tags Tree
- Open your PDF file, click “Prepare for Accessibility” on the menu on the Left-hand side.
- Click “Fix Reading Order” the last item on the menu. Before starting the create, you have to create tag roots .

- On the new Dialog box, check “Structure types” and uncheck “Display like elements in a single block”.
- Then start to create tag tree manually by following the reading order of the document.
- Choose the elements from the document, then from the reading order tool, select the appropriate choice such as Figure, Text/Paragraph, figure captions, Headings, Formula, cell, note, references, etc.
Important Note: Without tag roots, we cannot create a tag tree in our documents.
Note: Remember to add all regular text as Text/ Paragraph. If the text is a Title then Add it as a Heading.
Option #3: Create a New Tag
When creating a new tag tree using the Options menu, you must first add Tag Roots to the document. Without tag roots, a tag tree cannot be created. Then follow the steps to create each element in the PDF document according to the reading order.

- Select the item in the document,
- Click on the Tag icon on the right navigation panel,
- Click on the option icon
 .
. - Select “New Tag” on the new dialog box.
- In the “New Tag” drop down menu select appropriate property (such as headings, text/Paragraph, Figure, etc.).
- Then click “Close”.
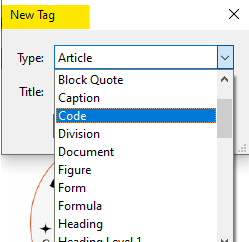
Note: We will give more specific information for fixing accessibility issues in the “Tag Tree” in the next section in detail.
Note: The most efficient remediation process is usually Auto-tagging the entire document first, then use Manual Tagging to clean it up from problematic tags.
 Takeaways
- PDF files created from scanned documents are usually inaccessible because the text is saved as an image.
- To ensure accessibility, use OCR software like Adobe Acrobat Pro to convert the text in the image-only PDF.
 Tips
Tips
- It’s important to ensure that all “Checking Options” checkboxes are selected, especially that “Document is not an image-only PDF” is unchecked before running the accessibility check.
- The process may take some time, depending on the length of your document.
- The tag tree generated by Adobe Acrobat Pro should be reviewed to ensure its accuracy and to make any necessary corrections. For larger documents, it is generally more efficient to let Adobe Acrobat Pro handle the tagging process rather than manually tagging the entire document.
- Adobe Acrobat’s PDF accessibility checker has its limits. PAC is an alternative free software for checking WCAG and PDF/UA compliance.
https://helpx.adobe.com/acrobat/using/create-verify-pdf-accessibility.html

