Purpose
The course syllabus template is now managed through CourseLeaf software. Connections to other Kirkwood systems ensure current and accurate information in your syllabus. Syllabi have a unique URL you can easily add to your Talon course. Syllabi are saved in the system allowing users to copy from previously created syllabi. In addition, departments will no longer need to collect and store course syllabi.
Log in
There is a link in MyHub or go directly to https://nextcreditcatalog.kirkwood.edu/course-search/

Welcome Page

Getting Started
Select the term from the dropdown. Enter your last name in the Advanced Search Instructor field.
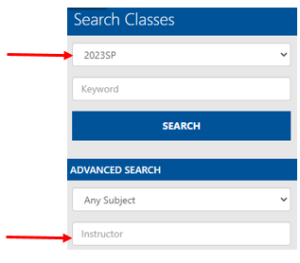
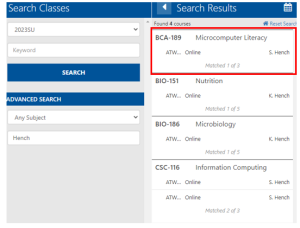
This example shows all summer 2023 courses taught by instructors K. Hench and S. Hench. I will create a syllabus for BCA-189.
Click the course title in the Search Results panel and all sections of the course will be listed. Notice sections taught by other instructors are grayed out as you are only able to create a syllabus for your own section(s). Note: EagleNet lists the synonym for a section while CourseLeaf lists the CRN. They are different.
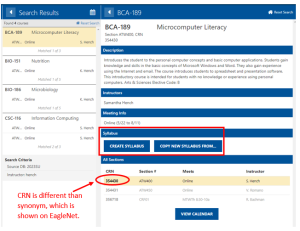
CREATE SYLLABUS starts from the standard Kirkwood template. The syllabus is automatically populated with course and section specific information from a variety of Kirkwood sources. The instructor input fields will all need to be filled in.
COPY NEW SYLLABUS FROM…All courses with the same subject code (e.g. BCA) are available to copy. This option copies all the instructor input fields from another syllabus. The syllabus is also automatically populated with course and section specific information. Click the button and another panel opens where you can select the term and search for a course to copy. Once you select a course to copy, you cannot undo this option.
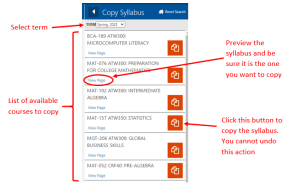
 Tip: If you are copying a syllabus, you must have the Section Code (e.g. MAT-102 CRF10). You cannot search by instructor name.
 Tip: COPY NEW SYLLABUS FROM... is a great option for lead faculty to deliver specific course policies, textbook information, schedules, etc. First create your own syllabus. Then email the term and section information (Summer 2023, MAT-076 ATW400) to all other faculty teaching the course so they can copy your syllabus. Include in your email which editable fields they should update (e.g. Instructor Information).
 Tip: If you make a mistake and copy the wrong syllabus, or otherwise need to start over, you can open the draft syllabus and delete the current version. More information lower on this page.
Creating your Syllabus
Click EDIT PAGE to begin customizing your course syllabus.
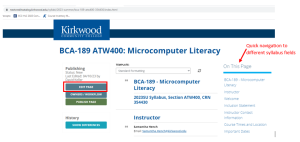
Syllabus Fields
There are three types of fields in the syllabus: static, instructor input, and optional. Once you have clicked Edit Page, you can see the icons for each field type.
-
- Static fields cannot be edited or hidden. There is no icon next to a static field
- Instructor input fields are identified with the pencil icon.

- Optional fields are designated with the eye icon.

Editor
Click the pencil icon to open the editor.

![]() Use this to paste text from Word or other sources to remove formatting from the source. Without this you may encounter unpredictable font sizes, margins, etc.
Use this to paste text from Word or other sources to remove formatting from the source. Without this you may encounter unpredictable font sizes, margins, etc.
![]() Select bold, italics, underline, superscript, and subscript text.
Select bold, italics, underline, superscript, and subscript text.
![]() Left, centered, right, and full justification.
Left, centered, right, and full justification.
![]() Numbered and bulleted lists, and indent.
Numbered and bulleted lists, and indent.
![]() Choose normal font and different headers.
Choose normal font and different headers.
![]() Create toggles. (The Kirkwood Resources section of the syllabus uses toggles.)
Create toggles. (The Kirkwood Resources section of the syllabus uses toggles.)
![]() Remove formatting.
Remove formatting.
![]() Add and remove hyperlinks, anchors, special characters.
Add and remove hyperlinks, anchors, special characters.
![]() Not functioning correctly or limited value to the syllabus.
Not functioning correctly or limited value to the syllabus.
Editing the Instructor field
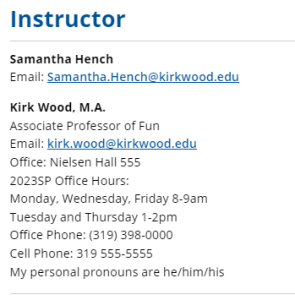
The primary instructor name and email are automatically filled in on the syllabus. You do not have to edit anything in this field. You may choose to add additional information about yourself to the Instructor field instead of adding it to the Additional Instructor Information field. You can also add additional faculty when you co-teach a course. In the example below Kirk Wood has been added as a co-instructor.
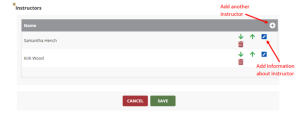
You may add additional information about yourself to the Instructor field by clicking the ![]() . This is an option instead of adding it to the Additional Instructor Information field.
. This is an option instead of adding it to the Additional Instructor Information field.
To add a second instructor to the course, click the ![]() and enter their information. At minimum, provide the second instructor’s name and Kirkwood email address. Note: adding an instructor to the Instructor field does not allow them access to edit the syllabus.
and enter their information. At minimum, provide the second instructor’s name and Kirkwood email address. Note: adding an instructor to the Instructor field does not allow them access to edit the syllabus.
Here is the popup screen when you choose to add another instructor or add additional information about yourself.
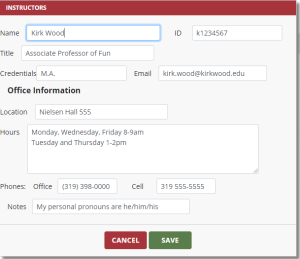
Here is how instructor information appears in the syllabus. Note you are not able to edit any of the labels in the Instructor field (e.g. cannot change Office Hours to Student Help Hours).
Instructor-input fields
Each of the following fields require faculty input. Within each instructor-input field italicized text in square brackets provides instructions to faculty. Normal font is text that should remain in the field. Once editing is complete be sure to remove italicized text and click SAVE.
 Welcome
[Write a statement welcoming students to your class. You may want to express your enthusiasm for working with students, encourage students to make contact with you, and/or give a brief description of the course or the information contained in this syllabus. See Syllabus Resources for example statements and further resources.]
 Instructor Contact Information
[List office location, office hours, telephone number, and link to your personal Zoom room if applicable. Strongly consider stating your pronouns. Consider renaming office hours “student help hours” or including a definition – many students do not know what these are for. Also, consider stating the best method & time for students to contact you and your typical response time. See Syllabus Resources for more suggestions.]
 Final exam Date
The last week of the semester is set aside for final exams. Most classes will only meet once during final exam week. The final exam for this class is scheduled on ____ from ___-___. [State the day, start and end times, and location based on the final exam schedule. Delete the first two sentences if the course does not meet for the entire 15 week semester. For regional center concurrent enrollment sections, instructors are encouraged to connect with the center director for clarification or with or with questions related to scheduling variations.]
 Course Materials
Required: [List required textbook(s) (including ISBN, if possible), supplemental readings, workbooks, software, calculator, or other technologies or materials. List only materials that students must have for the course. If there are no required materials, say so.]
Recommended: [List materials that are suggested but not required. If there are no recommended course materials, remove this paragraph.]
Books and course materials for this course are available at the Kirkwood Bookstore. [Remove this paragraph if there are no required/recommended materials or if all materials are OER. For more information about OER, please see the Syllabus Resources.]

 Additional Course Information
[Optionally, add any additional course description information or expectations for students in this specific course. This might include course structure or format, expectations for performance, interaction with other students and the instructor, class participation, cell phone/laptop use, etc. Please see Syllabus Resources for additional information.]

 Course Assignments
[Explain the activities and assessments that students will be completing as part of the course. Include due dates where appropriate. Whenever possible, avoid scheduling due dates to coincide with major religious holidays. You can place this information under “Student Evaluation” if you prefer. See Syllabus Resources for additional information.]

 Course Schedule
[Include a course timeline or calendar. This is optional but strongly encouraged. Providing test dates and due dates early and avoiding major changes to them are important to student success, especially for students with significant work or family responsibilities. Placing this information on a separate handout is a reasonable alternative to including it on the syllabus.
Whenever possible, avoid scheduling due dates to coincide with major religious holidays.]
 Student Evaluation
[Students must be able to determine how their course grade is calculated. Edit the table below to list the grading criteria used in your class, including the points or percent of the grade corresponding to assignments, papers, tests, journals, class participation, etc. Be sure your percentages add up to 100%.]
Editing the Grade Table
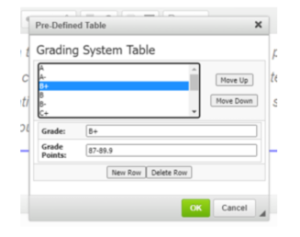
The grade table is a component of the Student Evaluation field. To edit the grade table, first click the pencil icon to edit the student evaluation field. Then, double click anywhere in the grade table.
A new window opens to edit the grade table. To edit a row, click the letter grade and then edit the grade and/or the grade points. Changes are automatically saved when you move to another grade. You can also delete a row and add a new row. New rows are added to the bottom of the table. Use the Move Up and Move Down button to organize the grades. When you are finished editing the grade table click OK to return to the Student Evaluation editing window.
 Late Work/Make-up Test Policy
[Describe the guidelines or policies used for making up missed assignments or tests, including the policy on late assignments. This might include taking the tests in the Test Center, expected notification of missed tests, etc.
Consider that rigid policies in this area may have disparate impacts on students. A policy that provides some built-in flexibility without requiring you to make judgment calls may be preferable. If the policy is strict, consider explaining the reason for the policy. See Syllabus Resources for more suggestions.]

 Attendance Policy
[List clearly any unique attendance requirements for the course. Strict attendance policies may have disparate impacts on students. A policy that provides some built-in flexibility without requiring you to make judgment calls may be preferable. If the policy is strict, consider explaining the reason for the policy. See Syllabus Resources for more suggestions.]
 Generative Artificial Intelligence Policy
[Each faculty should populate this field with a policy about artificial intelligence (AI) use in this course. See the Syllabus Resources for guidance and example statements.]

 Other Course Policies
[Optionally, list any policies specific to the course or program, including COVID-19 protocol in programs requiring one, information regarding exposure to hazardous chemicals, biohazard, invasive procedures, etc.]
 Optional Fields
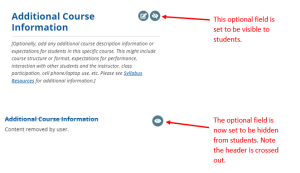
The default is for all optional fields to be visible. Several users have noted the visibility icon seems reversed. The eyeball with a slash through it means click to hide the field. It does not indicate the field is hidden.
Publishing Your Syllabus
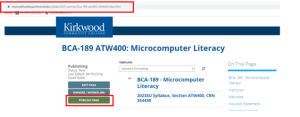
When you are finished editing your syllabus scroll back to the top of the page and click Publish Page. Publishing signifies to the college community that your syllabus is complete. Publishing is also the first step in providing students access to the syllabus.
Please note that once the syllabus is published, it will be visible to students as soon as the syllabus link is added to your Talon course. Beginning 21 days before your course start date, an automated process adds a Course Syllabus module and CourseLeaf syllabus link to Talon courses.
Adding your Syllabus to Talon
A Course Syllabus module containing the CourseLeaf syllabus link will automatically be added to your Talon course 21 days before the course start date. Instructions for doing this manually are included below, but should not be needed in most circumstances. For special circumstances such as merged courses, please review the Panopto tutorials.
![]()
If you copied your Talon course from a previous semester or another instructor, you will likely need to delete the old Course Syllabus module from the current Talon course. (See how to delete content from Talon.)
Manual addition of the syllabus link is usually not needed and may result in duplicate links once the automation runs. The steps below are provided for the fringe cases where manual addition of the link is necessary. This might happen if the automated link was deleted, for example.
- In CourseLeaf, copy the URL from the address bar when viewing your course syllabus
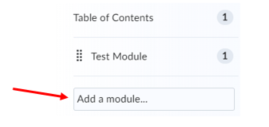
- In your Talon course, Click Course Content add a module called Course Syllabus.
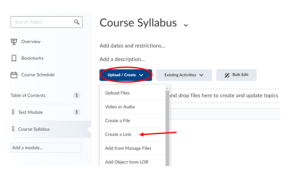
- In the Course Syllabus module, click Upload/Create and select Create a Link.
 Enter a title for the link (e.g. Course Syllabus + Course Name + Term) and paste in the syllabus URL. Remove “next” from the URL. The URL for students to access your syllabus should begin https://creditcatalog.kirkwood.edu/. Be sure Open as External Resource is checked and click Create.
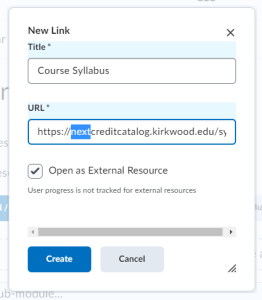
Example:
URL from CourseLeaf faculty site where syllabus was created:
https://nextcreditcatalog.kirkwood.edu/syllabi/2023-summer/bca-189-atw400-354430/index.html
URL for students to access the syllabus:
https://creditcatalog.kirkwood.edu/syllabi/2023-summer/bca-189-atw400-354430/index.html
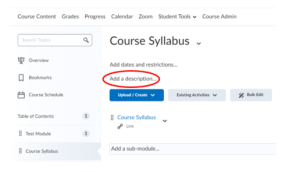
 Consider adding a brief description to ensure all students know what they will find in your syllabus.

Confirming your Syllabus is Published
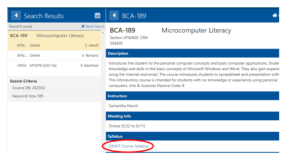
The best way to check if your syllabus is published is to navigate to the course in the search results panel. DRAFT Course Syllabus means the syllabus is being edited and has not yet been published.
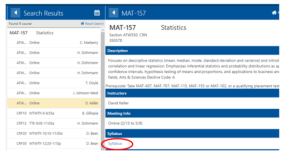
Once published, the Search Results panel will show the link text Syllabus.
Editing a Published Syllabus
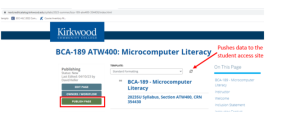
Once published, you can still edit by clicking EDIT PAGE. All editing is completed as described previously in this user guide. When you are finished editing, you must click PUBLISH PAGE and click the refresh data button to make changes visible to students.
Deleting or Starting Over with the Syllabus Creation Process
There is now a “Delete Syllabus” button which allows faculty to delete their own syllabus. This is useful in cases when faculty choose the wrong button (Create vs. Copy From) or when faculty reassignments occur and the original faculty started or published a syllabus. Use caution as deleting a syllabus cannot be undone!
Simply click the red Delete Syllabus button and confirm the selection. This will return you to the Search Classes page where you can navigate to your section and once again choose to create new or copy a syllabus. Please note this action cannot be undone and it is not possible to retrieve deleted syllabi.
