Section Template
Table of Contents
- Notifications
- Changes/Activity
- General Information
- Credits
- Instructional Methods
- Instructors
- Double Booked Instructor
- Enrollment Settings
- Meeting Patterns & Rooms
- Restrictions
- Billing – Coming Soon
- Relationships
- Notes
Notifications
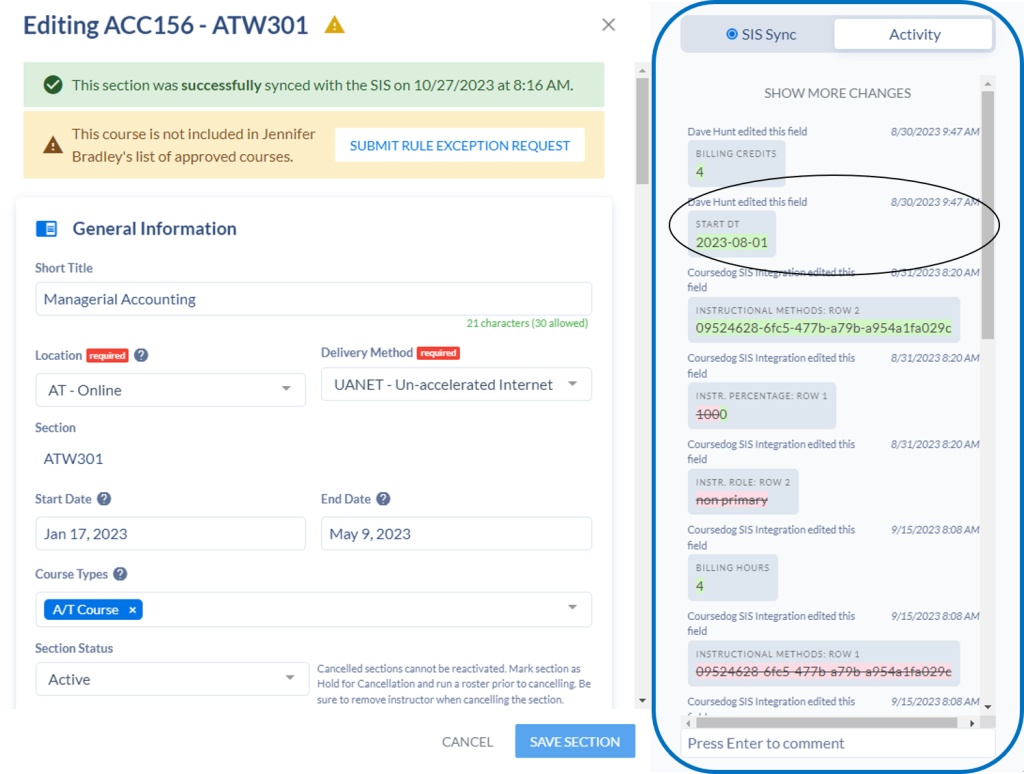
When the Section Template is open, there could be multiple colored boxes at the top of the Template.
General messages

- Green box with a check mark– This section has been synced with Colleague and any changes made in Coursedog have been updated in Colleague.
- Red box with an exclamation point– The section cannot be saved if there are any section violations. Each rule has a description and explains what needs to be updated. There are several hard stops built into Coursedog to assist building sections.
- Yellow box with an exclamation point – This indicates that something in the section needs to be double checked. Coursedog will let you save the section as these are just warnings.
- Yellow box with an exclamation point and a SUBMIT RULE EXCEPTION REQUEST box – This indicates there is something needing approval. By clicking the SUBMIT RULE EXCEPTION REQUEST button, a workflow will be triggered to the pre-set department/individual(s).
- If there are too many messages to fit on the screen comfortably, you will see yellow wording saying “SHOW “” MORE CONFLICTS.” By clicking this link, the other conflicts for the section will appear to be reviewed.
Section Syncing

After a section has been saved, it will sync realtime with Colleague. If the section is opened in Coursedog before the sync is complete, a message will appear saying that it is syncing with the SIS (Colleague) and that any new changes made might be lost.
Error message

If you see a red error while syncing message after a section is saved in Coursedog, this means there was an issue when Coursedog sent the information to Colleague. This can sometimes happen if a section is open in Colleague while changes are trying to be synced. Please email Academic Affairs with the section information and we will look into the issue.
Changes/Activity
When the Section Template is open for a section that has already been created, the last change made to that specific section can be seen on the right. It lists who made the change (Coursedog SIS integration means the change was made in Colleague), when the change was made and what change was made to the field.
General Information
The General Information area on the Section Template contains the information schedulers would add to SECT in Colleague.
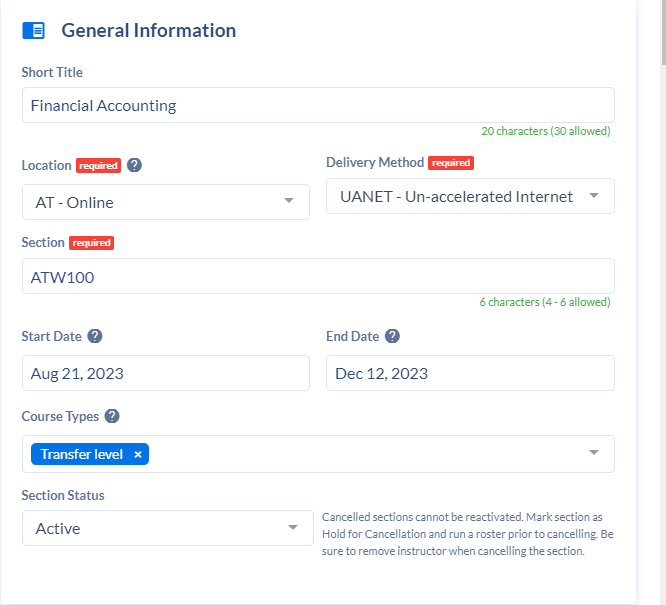
- Short Title – This is the title that will show in Course Planner. This is an editable field with up to 30 characters available.
- Location – Use the location code where the class is being held. The field will populate as empty from the course level. It should match the first two letters of the Section field. (i.e. for section number CRFxxx the location code is CR.)
- AT – Online
- BN – Benton County
- CD – Cedar County
- CR – Cedar Rapids – Main Campus
- IA – Iowa County
- JH – Coralville (Iowa City Area)
- JN – Jones County
- LN – Linn County
- OT – Other/Out of District
- SA – Study Abroad
- WA – Washington County
- WL – WebLive/Zoom
- Delivery Method – Be sure to populate the Delivery Method field. This information is used for state reporting and is extremely important! This classification system is divided into two main groups: Un-accelerated and Accelerated. Refer to the “Kirkwood Credit Course Section Delivery Methods” document for the definitions.
- Section – This is referred to as your Section Number. Fill in the box with 5 or 6 characters. Do not use the same section name for any two sections in the same term.
- The first two characters indicate location (i.e. CR for Cedar Rapids, JH for Coralville, etc.)
- The third character indicates the mode of delivery. Please do not deviate from this list. Requests for additions to this list need to be sent to Academic Affairs and the Registrar
- C – CCHS
- F – Face to Face
- G – Corporate Contracted
- H – Honors
- I – Individualized/Internships
- S – CCHS
- T – Zoom
- W – Online
- X – Flex
- 4th, 5th and 6th characters are for your use. You may use anything for these last characters. If the section is hybrid, please use H for the 6th character.
- Start/End Date – The Start and End Date will populate automatically as the term dates. If you update these dates, please be sure to also update them on the instructor(s) and the Meeting Patterns & Rooms. Sections cannot start before the End Date of the previous term and cannot end after the term end date. Student’s financial aid will be affected.
- Number of Weeks – This field must be updated to reflect the number of weeks the section meets. To confirm the correct number of weeks, run the Course Section Number of Weeks report. This report is located in Reporting Services. Home > Credit Reports > Section Checking Reports > Informational.
- Course Types – If you do not want this class to show on Course Planner, select NWEB from the drop down box.
- Section Status –
- Active – Leave the status as Active if you want students to be able to register for this section. (this is the default for the field).
- Cancelled – If the section is no longer needed, you may change the status to Cancelled. If you cancel a section please be sure to remove the instructor AND room (other than ATAW) from the section. Sections cannot be cancelled in Coursedog after registration has opened.
- Pending – The status of pending will stop students from being able to register and will remove the section from Course Planner. These sections appear on the CSSC report, but not on the CSAR report.
- Ghost – The status of Ghost will stop students from being able to register and will remove the section from Course Planner. These sections appear on the CSSC report, but not on the CSAR report.
- Hold for Cancellation – If you need to cancel a section and students are enrolled, change the status to Hold for Cancellation so no additional students can register. Run a student roster before cancelling the section so you can reach out to the students. If you cancel the section before you run a roster, you will not be able to get a student roster as there is no way to recover the names once a section is cancelled.
Credits
The Credits area on the Section Template contains the information schedulers would add to SECT in Colleague.
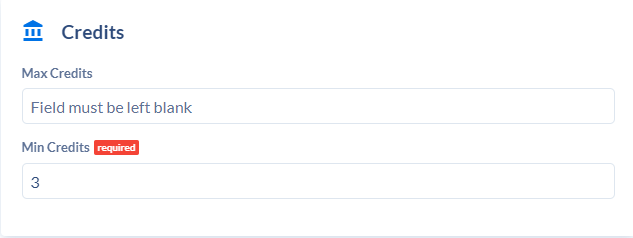
- Max Credits – This field must be blank. If the section is a variable credit section, there will be a value. This indicates the maximum number of credits a student can earn for the course. Be sure to delete this value prior to trying to save the section.
- Min Credits – Be sure this is the correct number of credits that the students should earn for the section. If this is changed from what populates automatically, be sure to also update the billing credits field.
Instructional Methods
The Instructional Method area on the Section Template contains the information schedulers would add to SOFF in Colleague.
The Instructional Method, Instructional Load and Contact Hours will populate information from the course level.
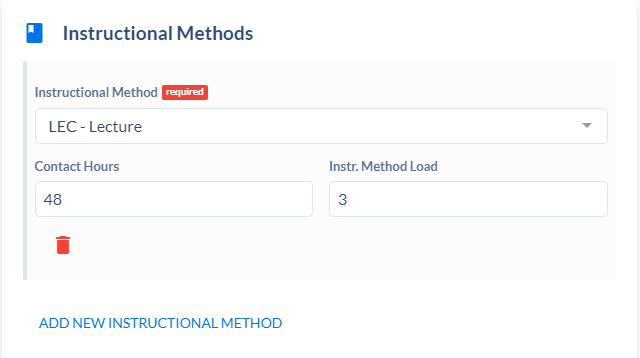
To add additional Instructional Methods (i.e. L/L, AT-W, WEBLV, OV, etc.) click ADD NEW INSTRUCTIONAL METHOD. It will add a new drop-down for you to select the Instructional Method that needs added. Be sure to enter 0 for both the load and contact hours for any additional instructional methods.
- AT-W: Online
- CLI: Clinical
- CLI5: Clinical 5ch
- CLIOV: Clinical Overload
- IND: Independent Study
- INT: Internship
- LAB: Lab
- LABOV: Lab Overload
- LECOV: Lecture Overload
- L/L: Lecture/Lab
- WEBLV: WebLive
If you are offering a Lecture and Lab class in the same room, at the same time, add the Instructional Method of L/L and put 0.00 in Instructional Load field and 0.00 in Contact Hours.
Hybrid and Online sections must have the Instrutional Method of AT-W listed.
Instructors
The Instructors area on the Section Template contains the information schedulers would add to FASC in Colleague.

Instructors to be attached to the section will be attached by clicking +INSTRUCTOR. If there are multiple instructional methods (ie. Lecutre and Lab, Lab and Clinical) you will need to add the instructor that is teaching for each method.
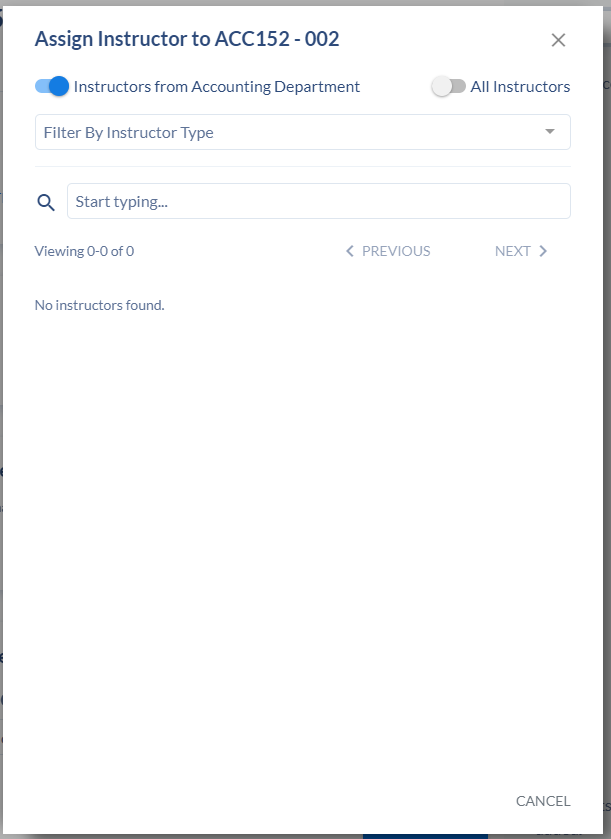
After clicking +INSTRUCTORS, an additional box will appear allowing you to search for the instructor. Select All Instructors at the top right of the box. The circle will turn blue. Filtering by Instructor Type does not currently work, but you can search by the instructor’s name by clicking in the box next to the magnifying class. Be sure to search by the instructor’s legal name (ie. chosen name is Dave but legal name is David, search for David). It is suggested to search by last name.
If you are unable to find a faculty member by last name or k#, check the FCTY screen in Colleague to see if they are listed with the primary department (on line 1), a percent, and a status. If these fields are blank, the instructor cannot be added to a section.
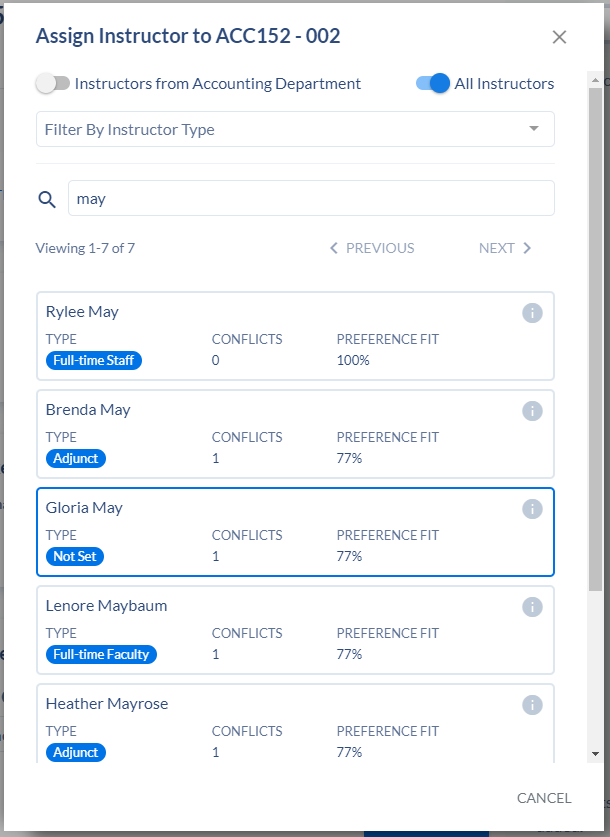
Click the instructor you need to assign to attach them to the section. You will be rerouted to the Instructors box. If you need to add the instructor again or add additional instructors, do this now.
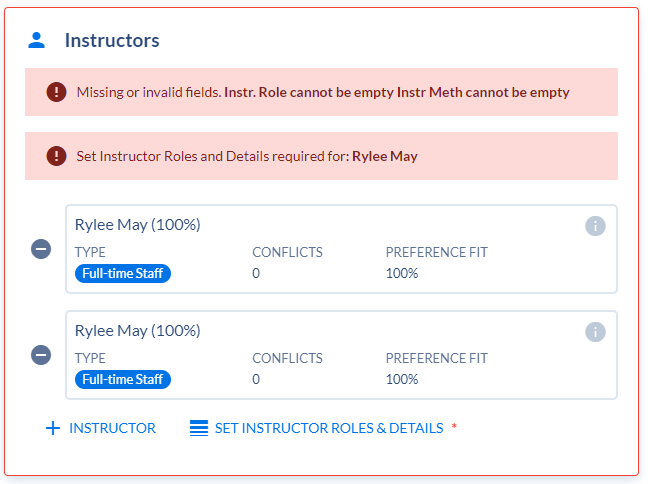
Once you have all the instructors attached, you will need to set the roles and details. Click SET INSTRUCTOR ROLES & DETAILS on the Instructors card.

The instructors you have attached will show with a down arrow to the left of each name. You will need to update the roles and details on each instructor listing. Click the down arrow next to the first instructor.
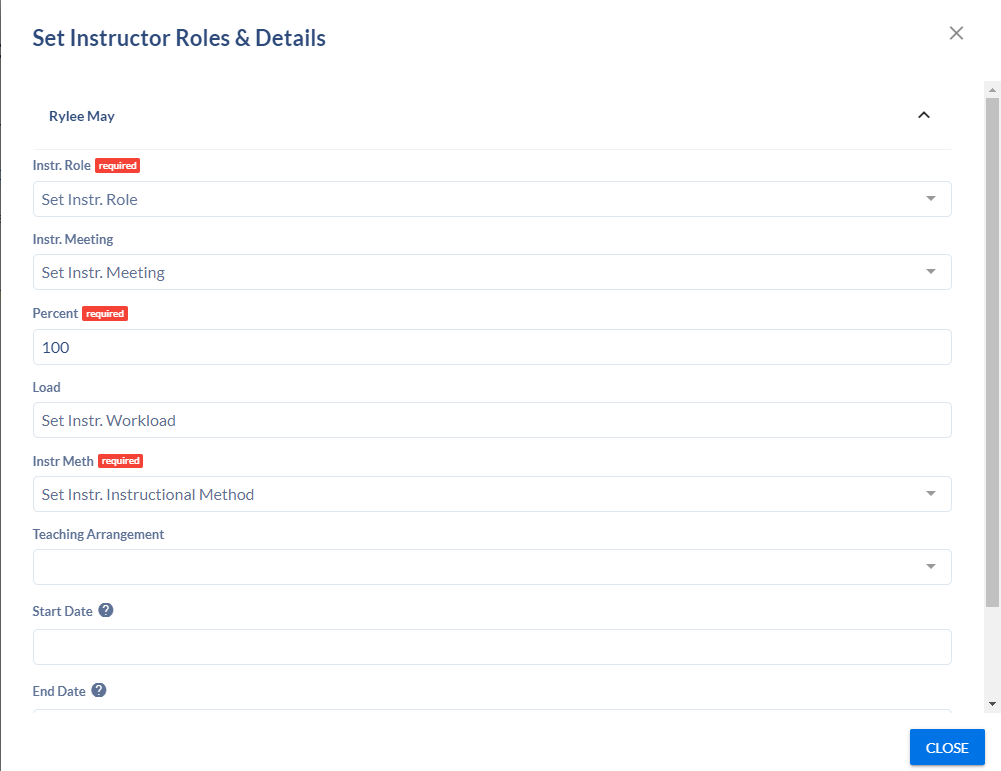
Each instructor needs the following fields filled out.
- Instr Role – The first instructor, and ONLY the first instructor listed, should be coded as primary. Any subsequent instructor listings should be coded as Non Primary. The Primary instructor creates the syllabus, as well as receives emails about attendance, students and grades.
- Instr. Meeting – This field is not used by Kirkwood.
- Percent – This will pull from the Instructional Method card, which pulls from the course level.
- Load – This will pull from the Instructional Method card, which pulls from the course level. Before you save out of the section template, this field will show as blank. Once it has been saved it will pull the default load. If you are changing the instructor’s load, you can do so here.
- Instr Meth – Select the Instructional Method associated with the section. Please remember that only Instructional Methods at the course level should be attached to the instructor (LEC, LAB, CLI, INT).
- Teaching Arrangement –
- Blank – this is college faculty
- HSC – High School teacher
- HOC – Partnership teacher
- NIA – Non-Instructor Access
- GUEST – Guest Instructor
- OCI – Online consortium
- OTHER – None of the above
- Start Date – The start date will autopopulate with the term start date after the section has been saved, but can be changed.
- End Date – The end date will autopopulate with the term end date after the section has been saved, but can be changed.
Double Booked Instructor

If you have an instructor that will be intentionally double booked, you can click yes to clear the Double Booked Instructor warning.
Enrollment Settings
The Enrollment Settings Information area on the Section Template contains the information schedulers would add to SRES in Colleague.
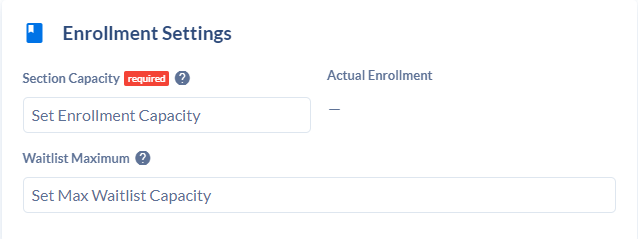
- Section Capacity – Make sure this field has a correct number in the box. Some courses have a blank in this box so departments may populate it on the sections. If you don’t fill in a number, an unlimited number of students may register for this section.
- Actual Enrollment – Once students have begun registering, the actual enrollment for the section will populate.
- Waitlist Maximum – This is the number of students allowed to be on the waitlist at a time. When this number is reached, the waitlist is full and students who try to register will not get the option to join the waitlist. This field will automatically populate with 12.
Meeting Patterns & Rooms
The Meeting Patterns & Rooms area on the Section Template contains the information schedulers would add to SOFF in Colleague.
On the Meeting Patterns and Rooms section, you will select a standard meeting pattern, create a custom meeting pattern, assign a building and room, update start and end dates, and assign an instructional method to each meeting pattern.
There is a Standard Meeting Pattern created to use for online courses called “No Days and No Times.” You are able to search for this in the Filter by Attributes box.
Adding a Standard Meeting Pattern

To assign a standard meeting time, click +MEETING PATTERN
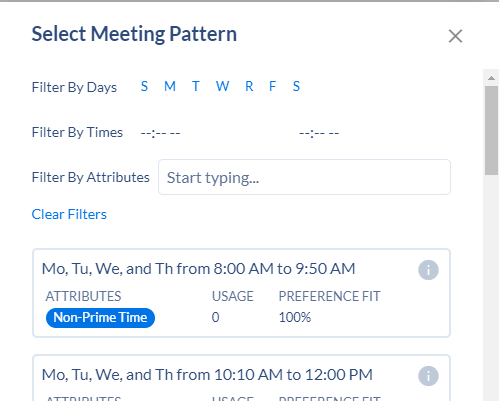
At the top of the Select Meeting Pattern box, you can filter to show just meeting patterns for specific days of the week (click the letter indicating the day(s) of the week) or for specific times (click on the dashes and enter the times). Click on the meeting pattern to assign it to the section. Please note that Tuesday/Thursday times that are two hour and one hour must be listed separately.
If you have more than one Standard Meeting Pattern to add, click +MEETING PATTERN to select another Standard Meeting Pattern.
Creating a Custom Meeting Pattern

Click the slashed stopwatch icon, then the +MEETING PATTERN button to create a custom meeting pattern.
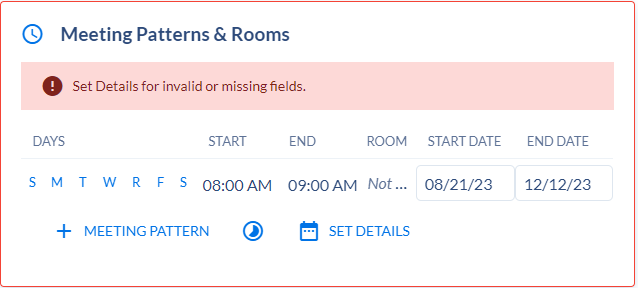
Once the custom pattern line appears, click the letter indicating the day(s) of the week and update the start and end time (24-hour clock time can be used).
If you have more than one Custom Meeting Pattern to add, click +MEETING PATTERN to select add another Custom Meeting Pattern.
Adding both a Standard and Custom Meeting Pattern
If you are using both a Standard AND Custom Meeting Pattern, try to create the standard meeting time first. If you create a Custom Meeting Pattern first, clicking on the stopwatch icon to switch to Standard will erase the Custom Meeting Pattern that is already created. If you do create a Custom Meeting Pattern and then need to add a Standard, you can still add that meeting time by clicking +MEETING PATTERN, you will just have to manually select the days of the week and enter the start and end times.
Changing the selected Meeting Pattern
To change a Standard Meeting Pattern to another Standard Meeting Pattern, click on either the days or times and the pop-up will appear allowing you to search for and select another meeting pattern.
To change a Custom Meeting Pattern, you can click on any of the letters for days or either the start and/or end time to select another option.
Deleting the selected Meeting Pattern
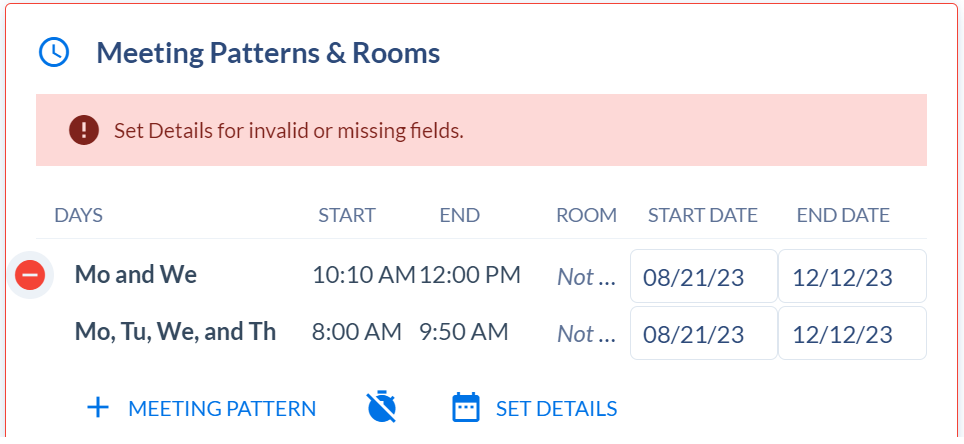
To remove/delete an established Meeting Pattern, hover over the days and a red circle with a white dash will appear to the left of the days. Clicking this icon will remove that Meeting Pattern.
Adding a Building and Room
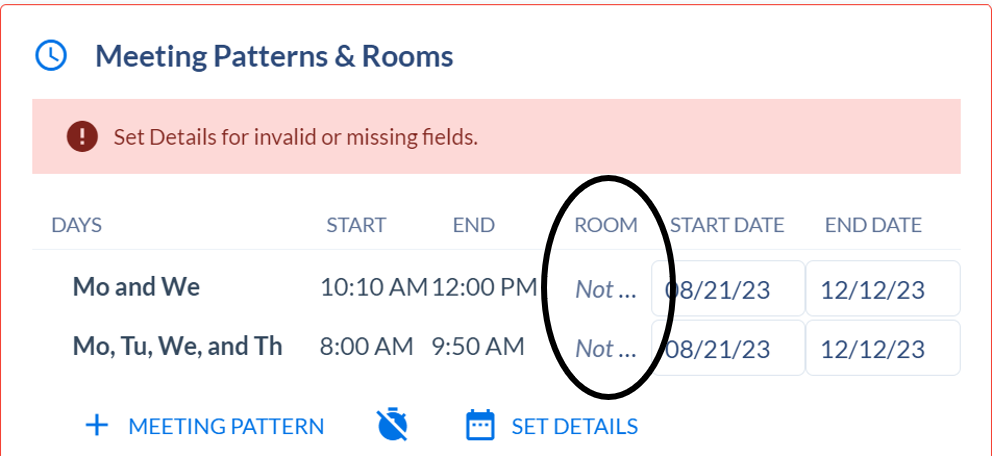
To assign a building and room. Click on Not… under the word room and a pop-up box will appear.
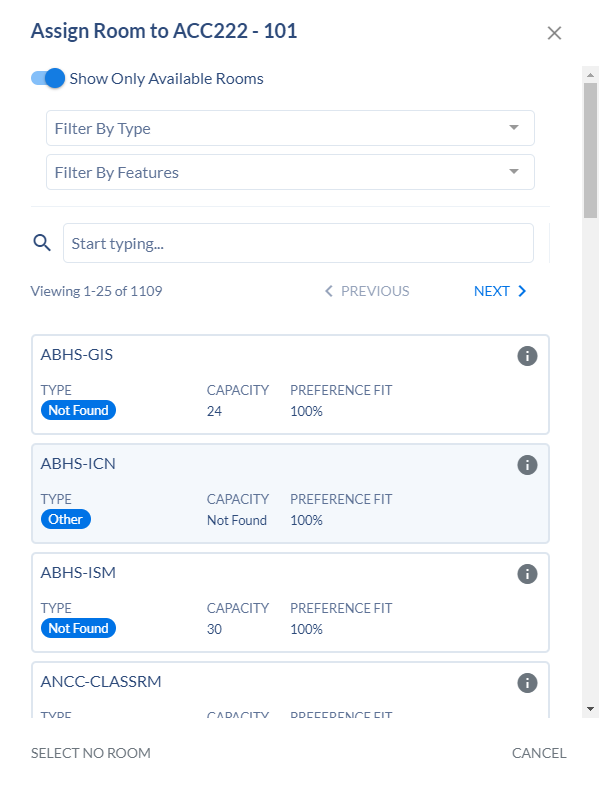
If this room is also being used by another section, please be sure to toggle the button next to Show Only Available Rooms at the top. Currently, the filter by drop downs will not help you filter room. You can search by building, room number or both. If you are searching for a specific room, be sure it is formatted building dash room (i.e. LINN-2192). Click the room box to book the room. Once the section is saved and synced with Colleague, the room will also be booked in 25Live.
Setting Details

If you need to change the Start or End date, you can do this now. Once your room is booked, it will take you back to the Meeting Patterns & Rooms section. Click SET DETAILS to finish updating the booking.
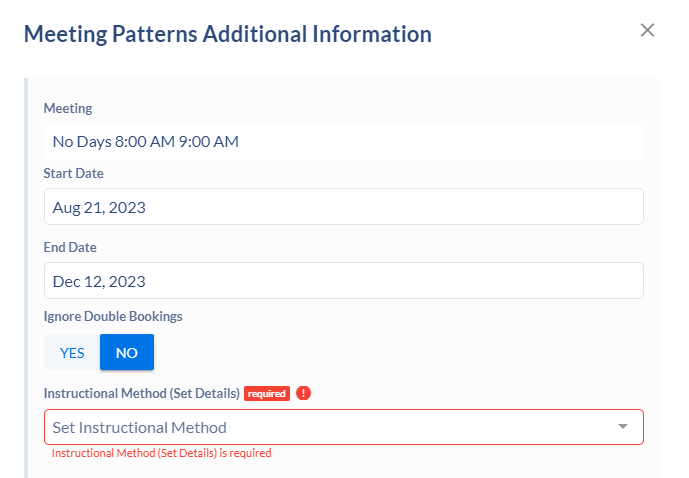
For each meeting pattern you have assigned, you will need to also assign the Instructional Method it should be tied to. This is backwards from how you build the meeting pattern in Colleague. Click the drop down for Set Instructional Method and choose the correct method. If the room will be shared with another section, be sure to toggle the Ignore Double Bookings button to Yes. If needed, you can also change the start and end date on this page. Clicking close or closing the window will save your selections and take you back to the Section Template.
Restrictions
The Restrictions area on the Section Template contains the information schedulers would add to SRES in Colleague.
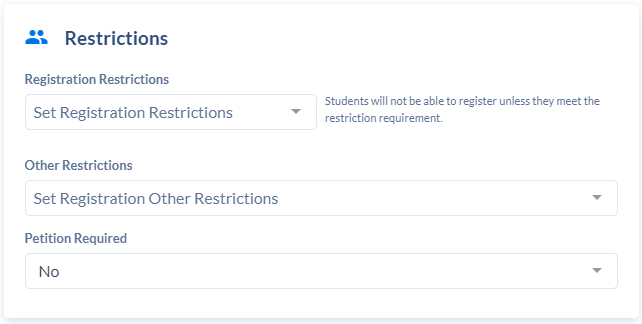
- Registration Restrictions – If there is a prerequisite at the Course level, that restriction will appear here. If you wish to restrict the section to a specific program, you may do that here. All online sections should have CUATAW attached.
- Other Restrictions – If this section has another restriction, you may indicate that in this field.
-
- If you have exams that will be arranged outside of the normal class time, you may note those sections with the restriction of EXAMS.
- If you have any sections that have hours to be arranged for instructional methods of ONLY Clinic or Internship, please attach the IAS code to those sections.
- All Hybrid sections should have HYBRD attached.
-
- Petition Required – If registrations for this section should be handled through the department, change the “No” in this field to “Yes.” Students will not be able to register for this section unless they contact the appropriate department.
Billing
The Billing area on the Section Template contains the information schedulers would add to SECB in Colleague.

- Billing Method – This field is autopopulated and cannot be changed.
- Billing Period Type – This field is autopopulated and cannot be changed.

If a new fee is to be added to a section, click + AR CODE. This will add a line to assign a fee. Multiple lines can be added if there are multiple fees to attach to the section.

- Code – This is the department AR code assigned to the fee. If you are unsure what the AR Code is, either refer to a previous section or refer to the Master Section Fees spreadsheet provided by Acdemic Affairs.
- Amount – Enter the dollar amount that should be charged to the student.
- Calculation Type – “A All” and “F Fixed” are the two options. The majority of fees should be set to Fixed.
Relationships
The section that you’re on when you create the relationship will always be the last section listed. Any sections you add to the relationship will be listed in front of it. For example, if you’re editing CRF01 and add a Linked Section on it, the section that you add to the relationship will get listed above CRF01 and will thus become the primary section in Colleague. The course added WILL be listed as primary. Therefore, if your builders are creating relationships from within the section editor/dashboard, you need to create the relationship on the non-primary section in order for the sections to be ordered properly and assigned correctly in Colleague.
If you are cross listing CRF01, CRF02 and CRF03 and you want CRF01 as the primary, create the relationship in CRF03, then add CRF01, then CRF02.
The Relationships (Cross-Listing) area on the Section Template contains the information schedulers would add to SXRF in Colleague.

To add a Relationship (Cross-list) to a section, click +CROSSLISTED SECTIONS. This will open the Add Relationship dialogue box.
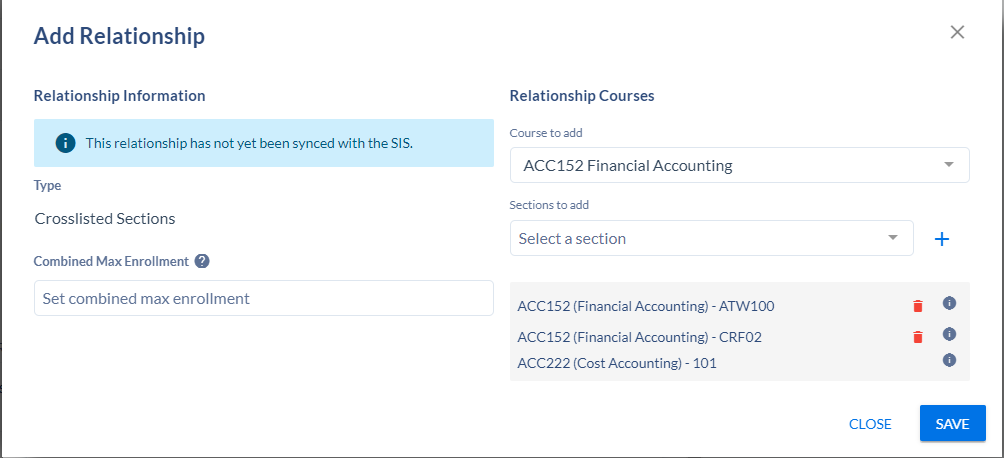
- Combined Max Enrollment (Global Capacity) – The Global Capacity is the total number of students allowed, this is usually determined by the size of the room, but may be determined by other factors.
- Course to add – Sections to be added will be searched for and added here. First search for the course where the section can be found. (i.e. ACC152 or ACC-152).
- Sections to add – Once you have selected a course, the Sections to add box will appear. The individual sections available to crosslist with this section will be listed. Select the appropriate section and click the ‘+’ sign.
- Please delete relationships in Colleague. If you need to add a cross-list with any of the sections un-tied, you will need to wait for the overnight sync to make the update in Coursedog, or update it in Colleague for the relationship to take effect immediately.
Once your Relationship (Crosslist) has been created, click Save to close the dialog box.
Notes
The Notes area on the Section Template contains the information schedulers would add to ASCI in Colleague.

Printed Comments show on the web, so use caution with wording. Keep comments as short and sweet as possible. These comments lengthen the section information in Course Planner. When Batch Copying is done, the Printed Comments will copy over. If you do not want these attached to the new sections, you’ll have to delete them.
If a section is CoReq’d with another section, please indicate by inputting the following in Printed Comments using the appropriate section number. i.e. Co-requisite section. Student will be registered for ENG-101-ATW302 automatically
If there is a petition on the section, please note which department to reach out to for registration.

