
PandaDoc – Faculty Payroll Step-by-Step
Updated September 2025 – Academic Affairs
STEP 1: RFAL PROCESS
- Download the RFALs and save as an Adobe PDF
- In Colleague change the output device from ‘P’ to ‘H’
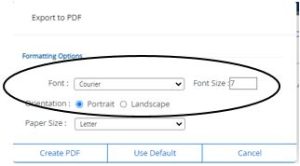
- Select ‘Export PDF’
- If necessary: update the settings in Colleague so that all RFAL information fits on the PDF
- Font: Courier // Font Size: 7 // Orientation: Portrait
*You may need to change these settings for other reports running in Colleague – remember to change them back when running RFALs to send through PandaDoc*
- Font: Courier // Font Size: 7 // Orientation: Portrait
- Download PDF ⇒ Save PDF to appropriate folder on desktop

- Open RFAL file in Adobe
- Checkmark or Dash the RFAL in Adobe (NOTE: Adobe settings may vary, your options may need to be generated differently)
- Checkmark or dash what you are submitting for payroll
- Click the right option in the circle below – this will then generate the second image to click the checkbox, or dash option

- Click the right option in the circle below – this will then generate the second image to click the checkbox, or dash option
- Checkmark or dash what you are submitting for payroll
- Save
STEP 2: How to input your RFAL
- PandaDoc ⇒ Templates ⇒ Shared with Me ⇒ Payroll Templates ⇒ click the appropriate template to open by clicking on the name

- Click ‘Use this template’

- Update the Document Name and input recipient emails
- NOTE: The Document Name appears as the email subject when you go to send
- Suggested Document Name: ‘TERM FT or ADJ DEPARTMENT RFALs (grant funded or not) – # Faculty’ (updating the underlined items to reflect specific details)
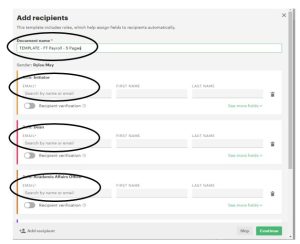
- Update the Document Name and input recipient emails
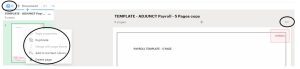
- Prior to adding the RFAL PDFs* – delete excess pages to your document, if necessary (pending the total amount of PDF pages)
*check total amount of pages in PDF as this may not be the same as the number of faculty*- You can do this with the three horizontal ellipses above and below pages, or by clicking the page document on the left side and hovering over a page to get the horizontal ellipses. Recommendation: Remove pages by going to the final page of the document (pg. 15)
- NOTE: If you do not do this step, then fields will either overlap (if total pages is less) and you would be deleting fields
- NOTE: If you do not do this step, then fields will either overlap (if total pages is less) and you would be deleting fields
- You can do this with the three horizontal ellipses above and below pages, or by clicking the page document on the left side and hovering over a page to get the horizontal ellipses. Recommendation: Remove pages by going to the final page of the document (pg. 15)
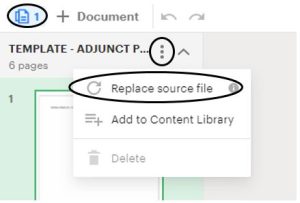
- ‘Replace Source File’ with the document you need to send
- You may first need to select the ‘document’ icon (near the left panel)
- Hover over the document name to show the three vertical dots next to document name
- Select ‘Replace Source File’
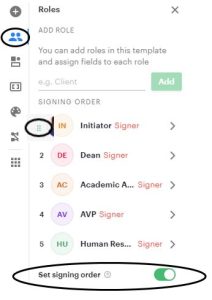
- Confirm that signature boxes are not blocking RFAL text and that all pages came through accurately (with highlights, checkmarks, etc.)
- Confirm the ‘Set signing order’ is set up correctly
- NOTE: You can reorder with the 6 dots to the left of a name
- NOTE: You can reorder with the 6 dots to the left of a name
Step 2a: Grant-Funded RFALs
- There are now templates for grant-funded RFALs (both Adjunct and Full Time).
- Please NOTE:
- Separate grant-funded from non grant-funded RFALs.
- Please leave it notated in the title of the document that it is a grant-funded batch.
- Be sure that the ‘see grant info’ text box does not overlap RFAL details.
- Include all grant-funded details in the lower boxes of each RFAL. Textboxes for this area are only included on the grant-funded templates.
- Should you have questions or need to update other templates with grant-funded information, please watch the following recording: Adding Finance Details for Grant Funded RFALs
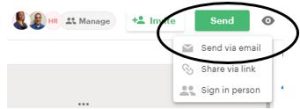
STEP 3: How to Send
- Click Send ⇒ Send via email
- Verify the Document Name is updated to reflect what is being sent
- Double check what shows as the subject is adequate detail with what is included (i.e. term, faculty type, department, and amount of RFALs in the batch). If any detail is missing, x-out and update the Document Name
- NOTE: If you update the Document Name in the email area, it only updates the subject of your email, not the Document Name. This can cause confusion when the final document is sent to all recipients.
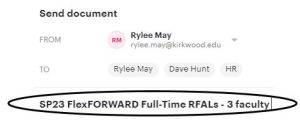
- Ensure the correct recipients are included on the email (shown above)
- Add message to recipients (box will appear to add this)
- You can create ‘Saved Messages’ to save time for repeat information

- You can create ‘Saved Messages’ to save time for repeat information
- This is the final opportunity to set/update automatic Reminders
- This can be set at the template level and you can update the setting with each document, if needed

- This can be set at the template level and you can update the setting with each document, if needed
- Click “Send Document”
Step 4: After Sending
- Recipients will receive an email
- These templates have ‘Set signing order’ as ON, with this, the document will send in the order the recipients were set
- If you are first in the ‘Set signing order’ as soon as you send the document, you will receive an email to open the document and start completing the fields assigned to you
- REMINDER: You can adjust your signature, etc. with your PandaDoc settings, if you choose
- View where the document is at in the process
- You can view this on the ‘Home’ tab within ‘Your Activity’ or by clicking into the document from the ‘Documents’ tab on the left panel
- Setting up Reminders will help so that you do not have to manually remind recipients to complete their portion
- PDF download
- Once all recipients have completed their required fields, all recipients will get an email that the document has been completed
- If necessary – you also have the ability to print/view a time stamped certificate
NOTE: Human Resources does maintain a copy of RFALs for each faculty member.
Kirkwood RFALs via PandaDoc Best Practices:
- Try to keep RFALs to no more than 15 faculty per PandaDoc batch.
- In the Document Name, include how many RFALs are in the batch (HR request), as well as if it is a grant-funded batch or not.
- Checkmark or dash what is being paid – per HR, highlights do not show up when uploaded to faculty Perceptive file.
- No need to separate emeritus and non-emeritus adjunct faculty in batches.
- Signature and text boxes cannot be covering payroll information (text from the RFAL).
- Per Lorna – if paying for a previous term (i.e. missed payment), send as its own individual/batch to make clear to HR. Please also make a comment or note in email for it to stand out.
- Template Specifics (all of this is set up for you)
- Signature, date, comment text box for Dean and AVP
- Checkbox, initials and comment text box for Lorna/Stephanie
- Each page of payroll needs signer information and date – for initiator, dean and AVP
- Include Grant information that is on the printed copy on your templates
PandaDoc Resources on Above Info (several additional available in the PandaDoc ⇒ Help Center):
- PandaDoc video – Create, Send and Track Documents: https://fast.wistia.com/embed/channel/l6emqibb5d?wchannelid=l6emqibb5d&wmediaid=9bdu0zmehs
- Template overview: https://support.pandadoc.com/hc/en-us/articles/360041230753-Save-time-with-templates
- Add and Manage Recipients: https://support.pandadoc.com/hc/en-us/articles/360042863934–Editor-2-0-Add-and-manage-recipients?utm_medium=email&_hsmi=252119544&_hsenc=p2ANqtz-90vAU2HW1g2oAm0M6tg1ff_UkZPpqadUOZRXAMtz3yEdmQk1rFnY02JfDdH_G3GHpmkj0NV5t9PTB_xDY-_1YPqgueVQ&utm_content=252119544&utm_source=hs_email#h_68a166c0-c49d-4e8e-bad7-1575bb20d149
- PandaDoc Glossary: https://support.pandadoc.com/hc/en-us/articles/360007915953-PandaDoc-glossary
