PandaDoc – Faculty Workday Agreement (Staff Information)
Updated May 2024 – Academic Innovation, Strategy and Design
Step 1: Access the Template in PandaDoc
- Login to PandaDoc
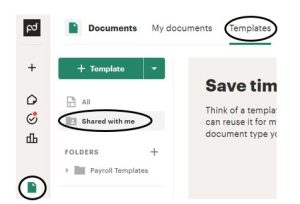
- Go to Documents (located on the left-side menu) ⇒ Templates (can be accessed on the left-side menu, or the upper panel/banner)

- If you do not have department-specific adjustments to make, you will access the WDA form by clicking Templates ⇒ Shared with me
- If you have department-specific adjustments to make:
- First access the WDA form by clicking Templates ⇒ Shared with me
- Hover over the template name, and on the far right select the three vertical dots/ellipses ⇒ click “+ Make a copy”

- This will then move the template to the “All” folder, where you can make the department-specific adjustments
- Click on the template name you need to open – ‘2023-2024 Faculty Assigned #(174 and/or 201) Workday Agreement (First Name, Last Name)’
Step 2: Confirm department-specific details are reflected on the Workday Agreement
- If there are required days or other specific details needing to be included on the form, update the template to reflect this information. By updating it at the template-level, this will help to make sure you do not have to update the information each time you go to send the Workday Agreement to each individual faculty.
Step 3: Prepare to send the agreement (turn the template into a document) – Input recipient information
- Click ‘Use this template’

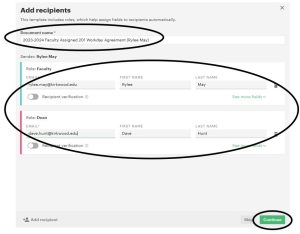
- Update the document name to reflect the faculty you are sending it to
- Suggested document title example: ‘2023-2024 Faculty Assigned ### Workday Agreement – Rylee May’
- Input the Recipient Information (faculty and dean)
- Click Continue

- Confirm details look correct (the template is now a document, set up to be sent to a specific faculty member)
Step 4: Send the agreement
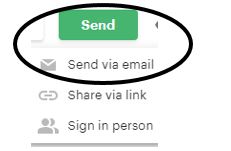
- Click Send ⇒ Send via email

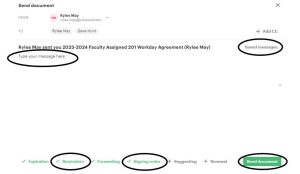
- Insert message to your faculty
- You can create a ‘Saved Message’ to not have to copy and paste, or re-type each time. To do so:
- Start typing your message
- Click ‘Saved messages’ in the message box
- Select ‘+ Create new message’
- Title your message and input the message text
- Save
- To access Saved Messages in the future:
- When you are in the message box, click ‘Saved messages’
- Select the message you wish to insert for your recipients
- Confirm reminder settings and signing order are set
- Click “Send document”

- You can create a ‘Saved Message’ to not have to copy and paste, or re-type each time. To do so:
Step 5: Form Routes
- The form will then route to the faculty, and then to the department Dean to complete their required fields
Step 6: Final Document
- Once all recipients have completed their information, each recipient will receive an email from PandaDoc with the final document attached
As of January 2024, the final document will come from Kirkwood Community College


