Validating Schedules
Updated July 2024 – Academic Affairs
Table of Contents
- Step 1: Check Conflicts Report
- Step 2: Schedule Builder Identifies Department
- Step 3: Schedule Builder Submits Department Schedule for Validation
- Step 4: Approver Receives Validation Request
- Step 5: Approver Submits Decision
- Step 6: Schedule Builder Tracks Request Details
- Step 7: Schedule Builder Submits Section Change Request after Department Schedule is Submitted for Validation in a Term
Schedule Validation is used for mass approval of a department’s schedule within a specific term. Schedules need to be submitted for Validation prior to students viewing the schedule.
NOTE: Effective with the 2024-2025 schedule and moving forward, schedule validation is no longer required until further notice. Departments may still review schedules internally, but no formal validation step is needed at this time.
Step 1: Check Conflicts Report
Prior to submitting a Department schedule for Validation, you will need to check the conflicts report and clear up warnings, and submit Rule Exception Requests for those that have a workflow set up.
Examples of Rule Exceptions: on-campus courses exceeding 39 students and instructor not approved to teach a course (i.e. missing faculty qualifications).
For steps on utilizing the Conflicts report, please see the details within the Rule Exception Requests documentation.
Step 2: Schedule Builder Identifies Department
- Navigate to the Departments assigned to you in Coursedog
- You can navigate to Departments through the Section Dashboard, then select the ‘Departments’ tab

- You can navigate to Departments through the Section Dashboard, then select the ‘Departments’ tab
- Identify the department you are ready to submit for Validation

Step 3: Schedule Builder Submits Department Schedule for Validation
- Identify the Department you are ready to submit for Validation
- Select ‘Validate Schedule’

- Review Section Conflicts
- Prior to submitting, click into each tab to review remaining section conflicts in the Validation process.
If there are conflicts that you can resolve prior to submitting, please update and resolve those at this point.
NOTE: If Rule Exception Requests are still present, please close out and submit those individually before moving on in the Validation process.
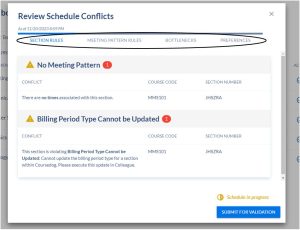
- Prior to submitting, click into each tab to review remaining section conflicts in the Validation process.
- Once conflicts have been addressed, click ‘Submit for Validation’
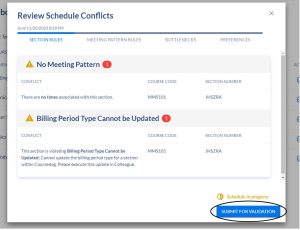
- Scheduler is routed to the Request
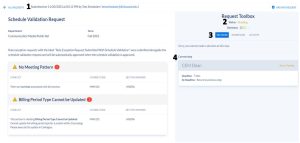
- Once ‘Submit for Validation’ is selected, the system will route you to the Request (a screen with details and tracking on the Validation Request). In the Request screen, a few of the items shown:
- (1) When the Request was submitted (and by who)
- (2) The status of the Request
- (3) Tabs to view the decision, the workflow of the Request, and any activity from the Request
- (4) The current step information (this is the individual who is next in the approval workflow)
NOTE: Once a Department is submitted for Validation, you will be unable to make further edits to sections within that particular term, for the specific department that was submitted, until the Validation process is completed.
- Once ‘Submit for Validation’ is selected, the system will route you to the Request (a screen with details and tracking on the Validation Request). In the Request screen, a few of the items shown:
Step 4: Approver Receives Validation Request
- The next approver in the workflow will receive the Validation Request notification
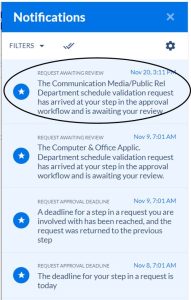
- To review the Validation Request, the approver can click into the notification, or navigate to the ‘Requests’ tab
- ‘Requests’ can be accessed by clicking the hamburger menu (1) ⇒ Requests (2) ⇒ Vote Required (3) ⇒ Select the Request (Department submitted for Validation) (4)

- ‘Requests’ can be accessed by clicking the hamburger menu (1) ⇒ Requests (2) ⇒ Vote Required (3) ⇒ Select the Request (Department submitted for Validation) (4)
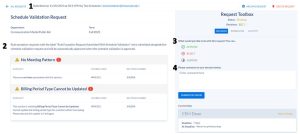
- For the specific Request, a few items the approver will see in the Request screen are:
- (1) When the Request was submitted, and by who
- (2) Outstanding conflicts on sections within the Department submitted
- (3) Decisions eligible to select for the specific Request
- (4) Area to input a comment based on the decision
NOTE 1: If an approver wants to see specific sections within the Department, they would need to navigate to the Section Dashboard.
NOTE 2: An approver is not able to approve some of the Request, and reject other portions. If anything needed to be rejected, the approver would have to reject the entire Request. The builder would then correct any issues, and resubmit for Validation.
Step 5: Approver Submits Decision
- The approver will see eligible decisions for the specific Request – the most common are Approve, Reject, and Suspend. Below outlines each of those three options for the approver.
- Approve
The approver selects ‘Approve’ (1), then inputs a comment based on the submission (2), and clicks ‘Submit Decision’ (3)
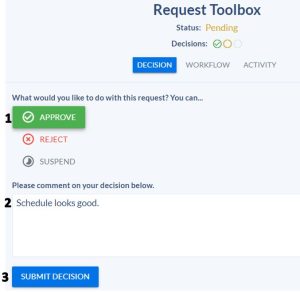
- Once the approver selects ‘Approve’ the specific Request will update. Immediately, the approver will see the following:

- Once the approver selects ‘Approve’ the specific Request will update. Immediately, the approver will see the following:
- Reject
The approver selects ‘Reject’ (1), then inputs a comment based on the submission (2), and clicks ‘Submit Decision’ (3)
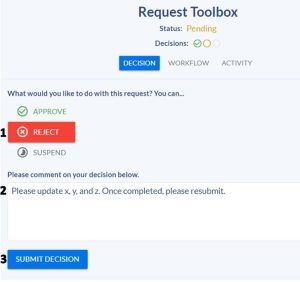
- Once the approver selects ‘Reject’ the specific Request will update. Immediately, the approver will see the following:

- Once the approver selects ‘Reject’ the specific Request will update. Immediately, the approver will see the following:
- Suspend
The approver selects ‘Suspend’ (1) then inputs a comment based on the submission (2), and clicks ‘Submit Decision’ (3)
Suspending a Request essentially pauses the Request. This is helpful to not miss the deadline set on the Request, but important to review the Request within reasonable amount of time.
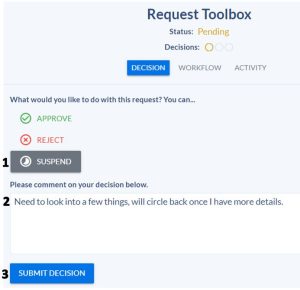
- Once the approver selects ‘Suspend’ the specific Request will update. Immediately, the approver will see the following:
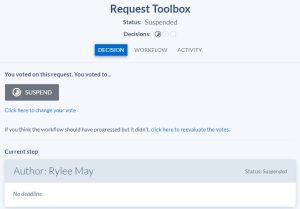
- When the approver is ready to update their decision, they will navigate to the Requests dashboard ⇒ ‘Vote Required’ (1) ⇒ select the specific Request (2) ⇒ ‘select Click here to change your vote’ (3)
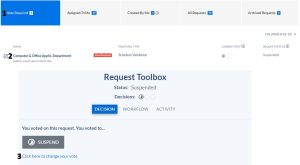
- From here, the approver can either Approve or Reject the Request
- Once the approver selects ‘Suspend’ the specific Request will update. Immediately, the approver will see the following:
- Approve
- Once the decision has been submitted as Approved or Rejected, the Request will clear from the ‘Vote Required’ tab within the Requests dashboard, and move to the ‘Assigned to Me’ tab (1) for the approver. Within this area, the approver can click back into the Request (2) to see the specific Requests details.
Suspended Requests will remain in the ‘Vote Required’ tab until a final decision has been submitted.

Step 6: Schedule Builder Tracks Request Details
Within the Requests tab a schedule builder can view all Requests they have submitted through Requests ⇒ Created By Me (1), and viewing specific Request(s) status, or progress within the workflow (2). Once a decision has been made on any Request, the individual who submitted the Request gets a notification. The submitter will receive an email, and will also see a notification within Coursedog when logged in (the bell in the top right corner of the application). The Status within the Section Dashboard will also update reflecting the decision.
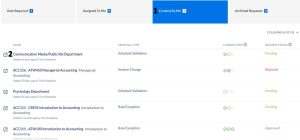
- Approved
- If Approved, the Schedule Builder will see the following in their Requests dashboard:

- If Approved, Section Dashboard will show the status of the Department in that specific term with an icon indicating ‘Submitted’

- If Approved, the Schedule Builder will see the following in their Requests dashboard:
- Rejected
- If Rejected, the Schedule Builder will see the following in their Requests dashboard:

- If Rejected, Section Dashboard will show the status of the Department in that specific term with an icon indicating ‘In Progress’

- If Rejected, the Schedule Builder will see the following in their Requests dashboard:
- Suspended
- If Suspended, the Schedule Builder will see the following in their Requests dashboard:
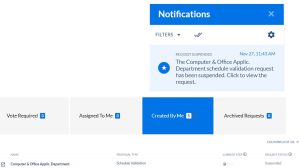
- If Suspended, Section Dashboard will show the status of the department in that specific term with an icon indicating ‘In Progress’

NOTE: The approver can update a Suspended Request to either Approved or Rejected.
- If Suspended, the Schedule Builder will see the following in their Requests dashboard:
Step 7: Schedule Builder Submits Section Change Request after Department Schedule is Submitted for Validation in a Term
Once the Validation process is completed for a Department within a term, section updates within the Department and term need to be submitted through a Section Change Request for the specific term, to be approved by the approver/Dean.
- There are two ways to submit a Section Change Request
- Option 1:
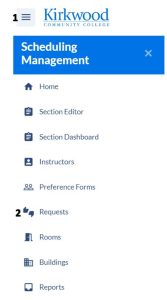
- To navigate the Request, click the hamburger menu (1) ⇒ Requests (2)
- Select ‘Create Request’

- Select the Request Type ‘Section Change’ from the dropdown (1) and click ‘Create Request’ (2)

- To navigate the Request, click the hamburger menu (1) ⇒ Requests (2)
- Option 2: From the Section Dashboard
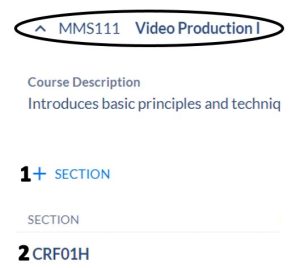
- Select the course you wish to add a section to (1), or the section needing to be updated (2)
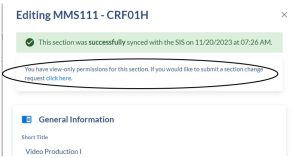
- Select ‘click here’ to navigate to the Section Change Request screen
- Select the course you wish to add a section to (1), or the section needing to be updated (2)
- Option 1:
- Select the type of Section Change Request, Input Request Details, and Submit Request
- Editing a section:
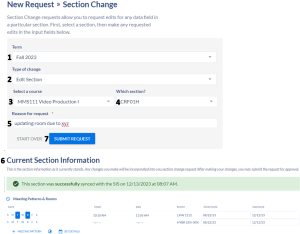
- Select the term you are requesting to edit a section (1)
- Select type of change – ‘Edit Section’ (2)
- Select the specific course you are requesting to edit (3)
- Select the specific section you are requesting to edit (4)
- Input the reason you are requesting to edit the section (5)
- Input specific section edits in the Section Template (6)
- Submit the Request to be reviewed by the approver/Dean (7)
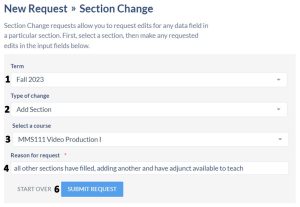
- If adding a section:
- Select the term you are requesting to edit a section (1)
- Select type of change – ‘Add Section’ (2)
- Select the specific course you are requesting (3)
- Input the reason you are requesting to add a section of the particular course (4)
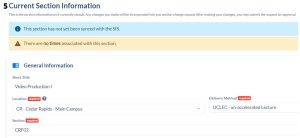
- Input specific section information in the Section Template (5)
- Submit the Request to be reviewed by the approver/Dean (6)
- Editing a section:

