
5 Course Content

Talon Course Content
Requesting a Course Early
Talon courses are automatically requested for instructors several months prior to the start of each new semester or term. However, it is possible to request a course before the auto-request process happens.
In order to request a course early:
- You must be assigned to the class
- Log onto the Talon Course Management for Faculty page and click the “Request Credit Courses” link
- On the request page, courses already requested are highlighted in yellow; courses available to be requested have a checkbox next to them
- Select which class (or classes) you are interested in and click “Next”
- Now you can adjust a course’s default open and close dates (the default is zero days before the official start date of the course and 14 days after the official end date)
- Click “Submit” to accept the defaults or save your changes
Requests are processed as they come in; usually courses are created in just a few minutes!
Copying Course Content
- Open your new course (the course should be empty of content) and follow Course Admin > Import / Export / Copy Components
- Select “Copy Components from Another Course/Org Unit” (the default) and click Search for offering
- In the Select Course Offering to Copy From pop-up, enter the name of the class to copy or enter the four digit year and two character term (e.g. 2021SP) for the semester
- Click the Search button to call up all the sections falling within the filter parameters
- Select the course you want to copy; click the Add Selected button
- Choose whether to Copy All Components (recommended) or Select Components; if you copy all course components, wait for the copy to finish
- If you choose Select Components a list of all course items will appear = > select which items to copy. NOTE – this can be tricky because tool items (e.g. quizzes, assignments, etc.) need to be selected along with their course content items; for this reason, copying all components is recommended
- Click the Continue button and wait for the copy to finish
Viewing Course Content
To access the Course Content page, click on Course Content in the navigation bar. It is important to direct students to Course Content to find materials and assignments because many students attempt to navigate their courses through the Calendar tool or Announcements tools, thereby skipping over Course Content altogether.

The Course Content page houses Modules containing the main elements of your class – files, Assignments, Discussions, Quizzes, web links, additional resources, etc. Please note that an instructor’s view of course materials differs from a student’s!
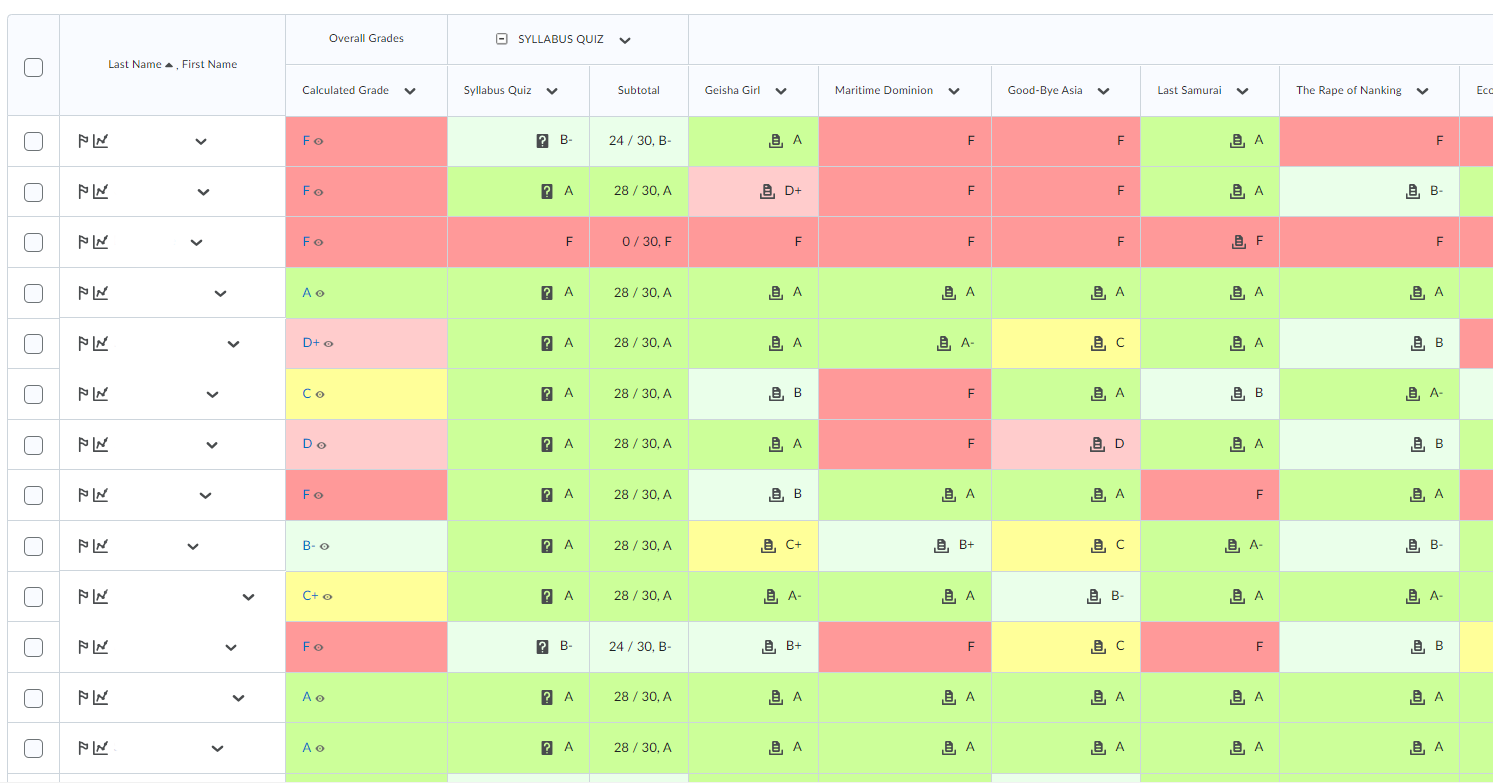
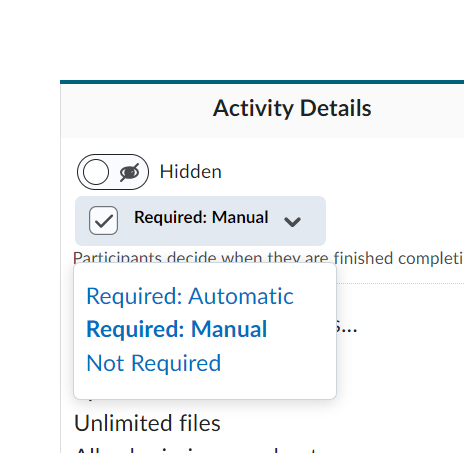
Students see a progress bar showing them how many (required) Content Topics within the Module they have accessed. When they have completed everything in a Module, they will receive a checkmark next to it. Note that “completion” may only mean “viewed” for some content items and does not necessarily mean they have completed all requirements elements assigned.
How do you know if a student is accessing the Modules? You can set completion tracking. Click on the two dash marks associated with each Content Topic and select either “Required: Automatic” or “Required Manual.” The content will then be flagged as having been accessed (“Required: Automatic”) or the students can flag the content as having been accessed on their own (“Required: Manual”).
When completion tracking of either method is selected by the instructor, the number of items to complete is then highlighted for the student within the Module under the Table of Contents.
Navigating Course Content
In either student view or instructor view, when you click on a Module title from the Table of Contents menu, it will appear on the right hand side. All the items in the Module are called “Content Topics”; when you click on a Content Topic, it opens full page and hides the Table of Contents. From here, you can use the breadcrumbs, the Previous and Next buttons in the upper right hand corner of the page, or expand the side panel to reveal the Table of Contents.
Course Content Global Settings
In the upper right hand corner of the Course Content page, you’ll see a link for “Settings.”
“Settings” allows you to adjust Display Options, toggle navigation settings, set default content, and apply Completion Tracking.
Creating and Managing Modules
The first step in setting up your content is to create Modules – basically folders of content. You may choose to organize your content in several ways:
-
- by week: this is a popular organizational pattern; you can have one module for each week
- by unit/topic: organize by unit or content topic
- by content Item: for example, all assignments exist in one module, all discussions in one module, all readings in another module, etc.
- by chapter: if your course is designed around your textbook, you may choose to organize it by textbook chapter titles
To add a Module in the Table of Contents, click in the “Add a Module” text area and enter a the Module’s name. A best practice is including meaningful information in that title; rather than “Chapter 1” try “Chapter 1: Communication Styles.”
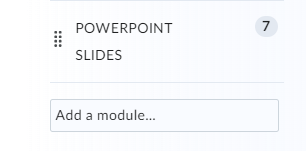
You can rearrange Modules by scrolling over the two parallel lines with eight dots adjacent to each Module title, wait until your mouse arrow becomes the four crosshairs, and then drag and drop. You can create sub-modules by dragging and dropping a Module inside another.
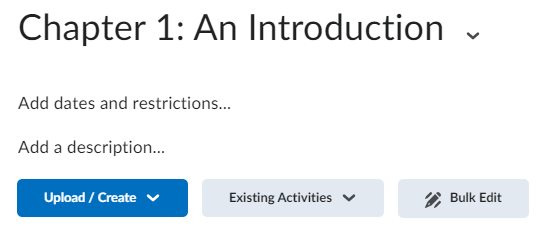
Content Items within modules are called Topics. “Topics” can be files, HTML pages, discussions, assignments, or quizzes. Clicking the Upload/Create button or the Existing Activities button allows you to include either completely-new content or material you have already designed.
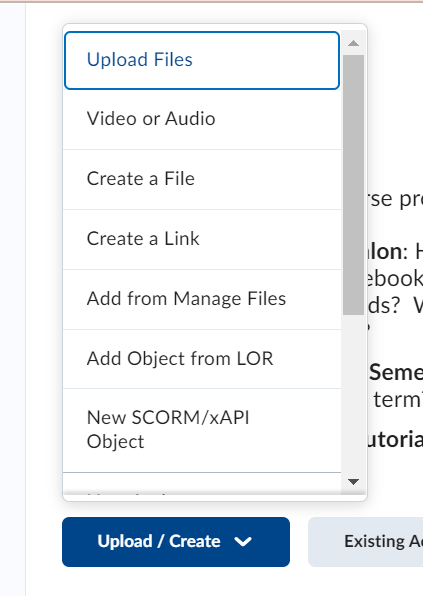
With the Upload/Create button, you have several options for new material:
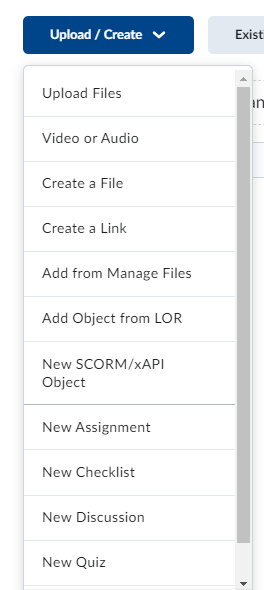
-
- Upload Files: uploads files from your hard drive. Note that .doc/.docx files are preferable because of their accessibility for students
- Video or Audio: allows you to embed video or audio files
- Create a File: creates an HTML content page
- Create a Link: links to an external site
- Add from Manage Files: adds a file from the “Manage Files” section to the Module
- Add Object from LOR: adds an item from the Learning Object Repository
- New Checklist: creates a “To-Do” list for students
- New Discussion: creates discussion forums and topics
- New Assignment: creates an assignment where students can attach and submit files
- New Quiz: creates quizzes, exams, or any other assessments using the Quizzes Tool
- New Survey: creates an ungraded survey
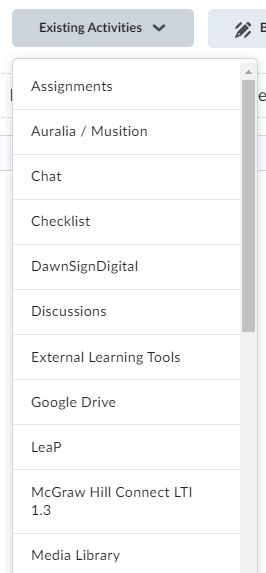
From the Existing Activities button you can choose to include an already-existing Quiz, Discussion, or other tool. It is recommended that you place all your course contents in Modules – otherwise materials may be too difficult for students to access. In doing this, you do not have to create submodules – you can have as many Content Items in a Module as you wish; the only key is to be consistent with your organization.
To delete a Module or Content Topic, click on the arrow icon next to the module title and click “Delete Module” or “Delete Topic.”
Content Topic Properties
Next to any Content Topic, click the action arrow [V] and then click “Edit Properties in Place” from the dropdown menu to view the Topic’s properties and settings.
Published and Draft Modes
When you create a Content Topic it is, by default, hidden from a student’s view, so it is necessary to change the default toggle to “Visible”. If you choose to hide a Module, for instance, materials inside it still might be accessible to students through the Calendar tool, Progress tool or Quicklinks.


The checkmark next to Content Topics in the instructor view means the Topics are published; in a student view the checkmarks represent completion tracking.
Content Descriptions
For each Content Topic it is possible to add a short description. This may be useful when explaining the purpose of the Topic, providing directions, or sharing any other additional key descriptive information. Below the item, Talon will automatically assign an icon and list the type of content item.
To add a description, click the action arrow [V] next to the Content Topic and choose “Edit Properties in Place.” Then, click on “Add a Description”; type in the description and click the Update button.
Completion Tracking
In student view, students see a Progress bar at the top of each Module which shows how much material they have accessed/worked through/completed, based upon the tracking settings an instructor has included. By default, completion tracking is set to “Required: Manual.” This mode allows students to manually check off topics when they want.
This can be changed to “Required: Automatic,” meaning Content Topics are automatically checked-off when students click on them. In addition to setting this feature within an individual Content Topic, instructors can click on “Settings” in the upper right hand corner of the Course Content page.
[VIDEO CONTENT FORTHCOMING]
HTML Editor Features
Instructors have access to a full HTML editor when any text is added in Talon.

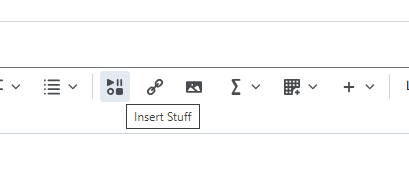
Insert Stuff
The Insert Stuff button has a Play/Pause/Circle/Square icon and allows you to embed YouTube videos, create Video Notes, and more.
-
- My Computer: upload a File from your computer
- Course Offering Files: insert a file that has already been uploaded into the course Manage Files area
- Video Note: add a video note; video notes are short videos (1 minute or less), that may be useful for quickly explaining a topic or directions
- Learning Repository: add files and objects from Kirkwood’s Learning Object Repository
- Video Note Search: search and add video notes that have already been created
- YouTube: find, link to, and embed a YouTube video
- Flickr: find and embed images from Flickr
- Insert Link: insert a link to an external URL
- Enter Embed Code: if you have an embed code from YouTube or another site, you can paste it here and the video will display on the page
Insert Quicklink
The Insert Quicklink option (the chain icon) allows you to link to any other Content Item within the course, or to an external URL.
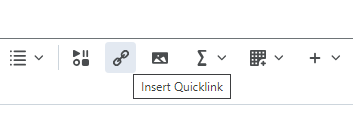
To create a Quicklink, click on the item type, then the specific item you wish to link to. Or, for the URL, enter / paste the web address for an external site. Best practice suggests that if you are linking to an external source you open it in a new window / tab.
Adding Video
Videos from YouTube, Panopto, or from your computer can easily be added in Talon. Videos must have closed-captioning in order to be ADA compliant, but also because that makes content more accessible for everyone.
Adding a VOD Link
(VOD closed-captions are added by Kirkwood Master Control. If the DVD has a closed-captions track this will be added for you; if the video does not have captioning already, you must submit a caption file along with the video. You can use YouTube to generate the caption (.VTT) file.)
-
- Choose a Module and click the Upload/Create button
- Click “Create a Link”
- Add a title and paste the URL into the URL area
Alternatively, many VOD titles are available in the Learning Object Repository (LOR).
To search and add a video from the LOR:
-
- Click on Upload/Create button and choose “Add Object from LOR”
- Click on “Show Repositories” (if not selected by default) and choose “Video on Demand”
- Type in the name of the video in the search field and click “Search”
- Select the video you want to add and click “Next”
- Choose the type of link you want to add. Typically, choosing the Dynamic Link is the best option because if the video or LOR content is ever updated, your link will automatically update
- Click Next and then Create Topic to add the video to your course content
Adding a YouTube Link
Unfortunately, YouTube’s automatic captions are not accurate enough to comply with accessibility laws. You can edit the automatic captions or upload a transcript and allow YouTube to set the caption timing for you.
To add a YouTube link:
-
- In a Module, click the Upload/Create button and select “Video or Audio”
- Paste either the URL or Embed Code from YouTube and save your changes
- Use “Insert Stuff” to search, add, and embed YouTube videos. Clicking on the Upload/Create button and “Link” and then pasting the YouTube URL will also embed the video on the page
Embedding a YouTube Video
In order to allow ALLY (accessibility scoring software) to determine a video’s accessibility, the video should be embedded within a Talon page:
-
- First, copy the link URL to the YouTube video for use later
- Create a new file in the Module and by clicking the Upload/Create button and choosing Create a File
- Give the file a name (maybe the same as the video)
- In the main section of the screen, paste in the URL you copied in Step 1 – this adds the link as text to the page (which is essential for ALLY to check the link)
- Hit enter on the keyboard to go to a new line
- Click the Insert Stuff button on the toolbar and choose YouTube
- Paste in the link you copied and click Search
- Select the resulting video that appears after searching and click Next
- After the preview renders, click the Insert button at the bottom.
- Click Save and Close to save your new page/file
Working with Panopto
Installing the Panopto Recording Software
There are two recording options in Panopto: browser application called “Capture” and a desktop application.
If you want to use the browser app (Capture), you don’t need to install anything on your computer. However, if you want to install the desktop recording app, you will need to do a quick download.
The application should already be available on your Kirkwood computer. For information on installing Panopto recording software, refer to Kirkwood’s Software Installation Support page. You will need to be on campus, or connected to a VPN, during this installation on a Kirkwood-issued computer.
Adding the Panopto Link to Your Talon Course
- Log in to Talon > Course Content
- Create or click on the desired Module in which you want Panopto content
- Click the Existing Activities button > External Learning Tools > Panopto Video
- A Panopto Video link is created in the course

Note: Clicking on the link for the first time (within a Talon course) creates a Panopto class folder (for the current course only) along with an assignment. Instructors are given a “creator” role, while students are given a “viewer” role for the course folder. Students, however, can use the assignment folder to create and upload class-related videos. If you don’t plan to have students submit videos, you can close the assignment folder.
To close an assignment folder:
- Click on the action arrow [V] associated with the class folder
- Select the class folder > click the gear icon for “Folder Settings”
- Be sure you are in the “Overview” section
- Click the “Close” link at the bottom of the pop-up window
Recording and Uploading Videos to Panopto
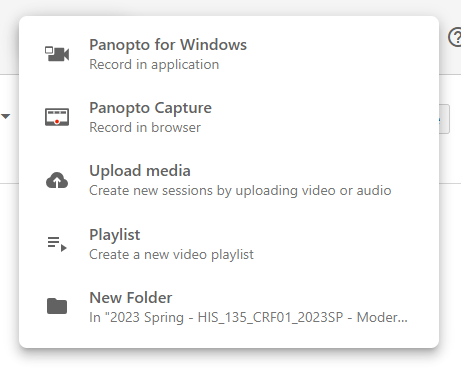
Once the recording software is installed, open the program on your computer, sign in, and click on the Create button. You can also access the program by clicking on the Panopto Video link within your Talon course and then clicking the Create button.
The screen capture below shares user options when accessing Panopto via Talon.
Embedding Panopto Videos into Talon
Use the Insert Stuff button (square icon with four elements) to place a Panopto video into a Talon page, Announcement, Widget, Module description, Discussion, and so on.
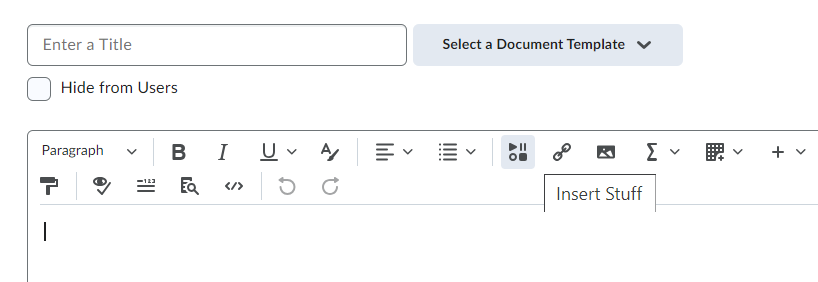
- Click the Insert Stuff button (when editing)
- Select Panopto at the bottom of the list in the pop-up window
- Choose your video by clicking the radio dial associated
- If all looks good, click the Insert button
Note: these are the same steps students use when submitting a Panopto video of their own to Talon.
Cookie Issues?
If you are experiencing issues with cookie permissions, please review Panopto’s supporting documentation, “How Do I Enable Third Party Cookies in Supported Browsers?”
Want More Panopto Support?
Access to additional support can be found via Panopto’s Support Page.
